
The increasing adoption of Kubernetes for orchestrating containerized applications has led to the proliferation of multicluster environments. While this offers benefits like enhanced resilience and scalability, managing multiple Kubernetes clusters introduces significant complexity, such as ensuring consistent security, compliance, and operational practices.
This article discusses how Red Hat Advanced Cluster Management for Kubernetes helps address these challenges with a centralized platform for unified management across a fleet of Kubernetes clusters.
Benefits
Ansible automation offers many benefits for managing Red Hat Advanced Cluster Management policies, including:
- Consistency and standardization:
- Eliminate configuration drift: Manually applying policies across many clusters is prone to errors and inconsistencies. Ansible applies the exact same policy definitions uniformly.
- Repeatable, standardized workflows: Ansible Playbooks allow you to define repeatable, standardized workflows for policy deployment, updates, and enforcement. This promotes best practices and reduces reliance on individual knowledge.
- Enhanced governance and compliance: Advanced Cluster Management policies are declaratively defined, and Ansible complements this by consistently applying these declarative states. If a cluster deviates from the desired policy, you can use Ansible to remediate the issue.
- Auditing and reporting: You can use Ansible to enforce policies and gather compliance data from clusters, aiding in auditing and generating reports on your security posture. This provides better visibility and control.
- GitOps integration: By storing Ansible Playbooks (which define policy application) in Git repositories, you can enable a GitOps workflow for your Advanced Cluster Management policies. This means policy changes are version-controlled, auditable, and can be reviewed and approved before deployment.
For more information, visit the Red Hat Advanced Cluster Management for Kubernetes product page.
Managing an Advanced Cluster Management policy with Ansible
For this article, we’ll use the external secrets operator for Red Hat OpenShift as an example. The external secrets operator is a tool for managing credentials and other sensitive data, providing a more secure alternative to storing secrets in plain text in a Git repository. It integrates with various external secret management systems across cloud platforms like Amazon Web Services (AWS), Google Cloud, and Microsoft Azure. In our demonstration, we will use AWS Secrets Manager.
The primary goal of the external secrets operator is to synchronize secrets from external APIs with Kubernetes. The operator uses custom API resources (ExternalSecret, SecretStore, and ClusterSecretStore) to provide a user-friendly abstraction layer. This allows for the secure storage and lifecycle management of secrets in AWS Secrets Manager. For this demonstration, we’ll configure an Advanced Cluster Management policy for the operator to pull these secrets and populate them within a specific namespace on the OpenShift cluster.
Prerequisites
The following prerequisites are required for this process:
- A running Red Hat OpenShift cluster (4.18 or later).
- An AWS account to store the secrets in AWS Secrets Manager.
- An Identity and Access Management (IAM) role with rights to the secrets in AWS Secrets Manager.
- An OpenShift Service Account to retrieve the secrets from AWS Secrets Manager to the OpenShift cluster.
- Ansible core package.
Implementation
To configure the Secrets in AWS Secrets Manager, create the secret in AWS Secrets Manager service, navigate to AWS Secrets Manager in AWS Console and click Store a new secret and proceed.
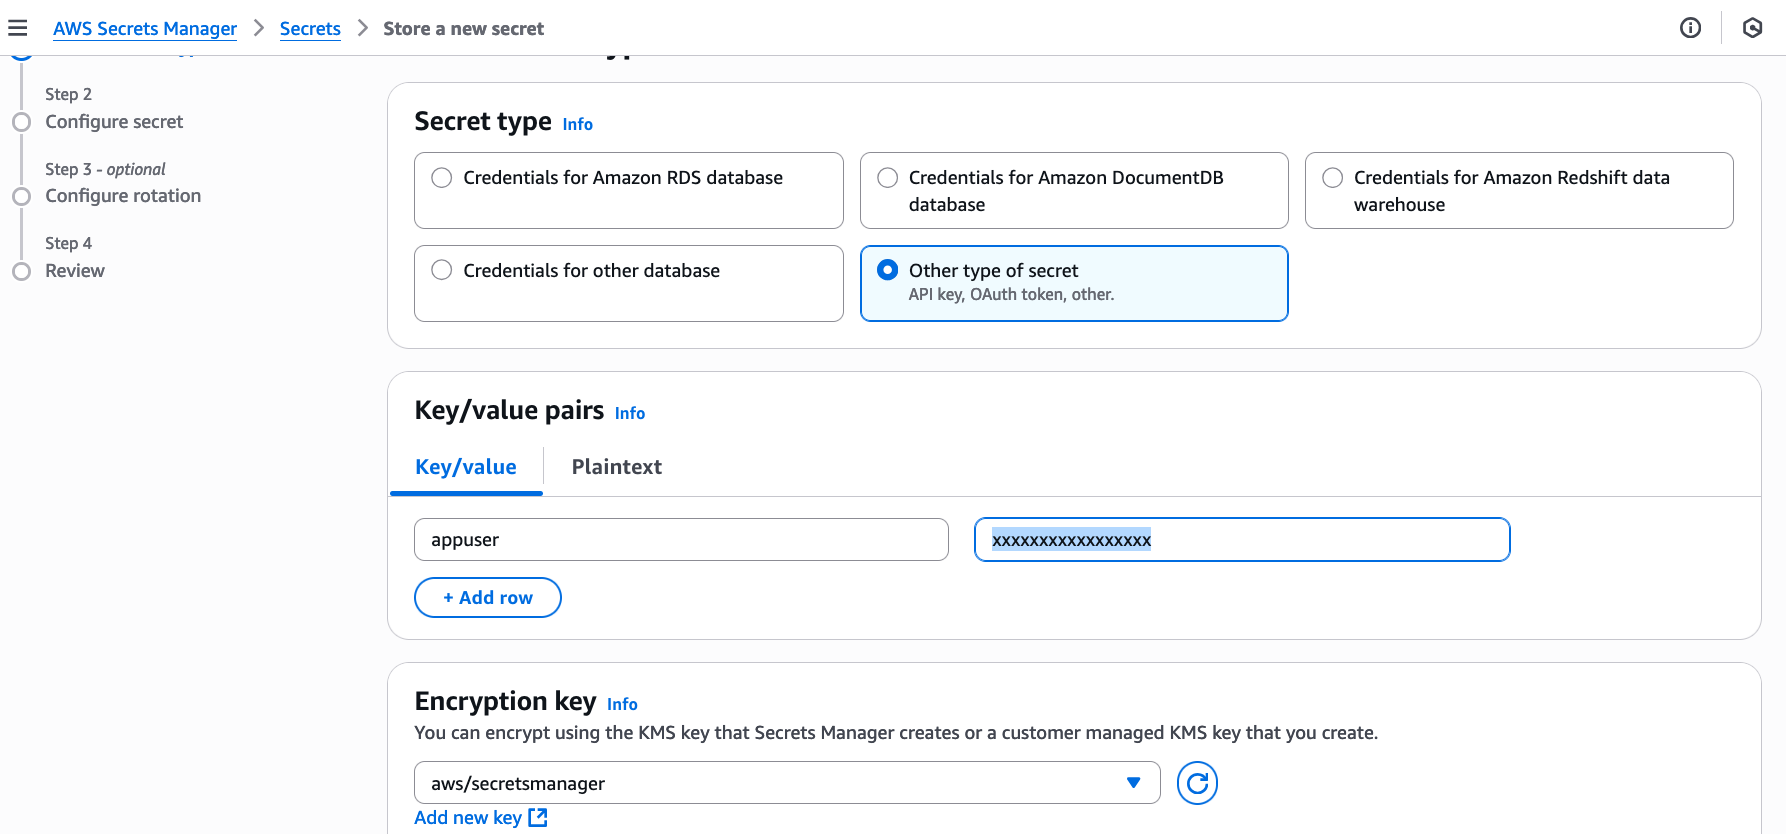
Under Choose secret type, select Other type of secret and add the values of the secret.
Create a secret called app-secret with key value of appuser and a password (Figure 1).
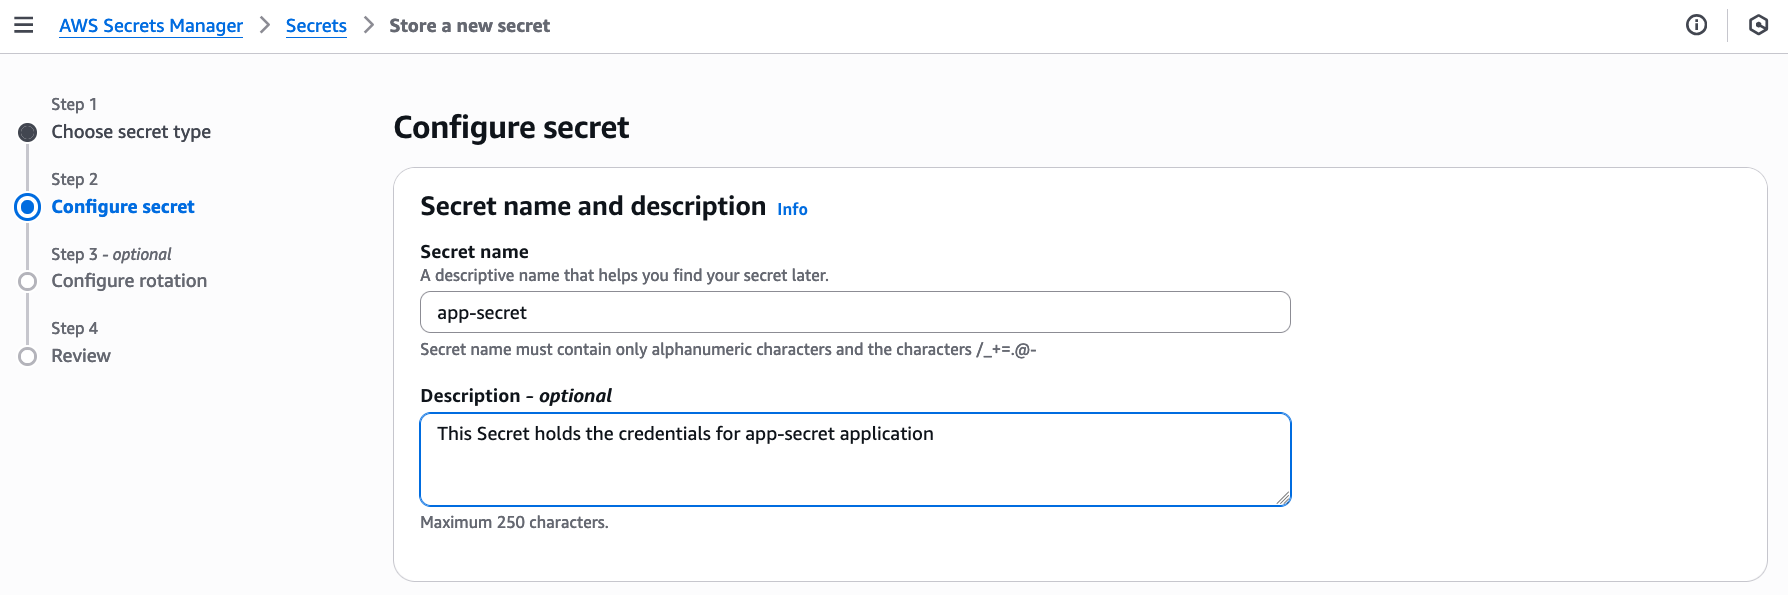
On the next page, add the name of the secret along with description (Figure 2).
Proceed with completing the secret creation process in the next windows and click Store to complete the process.
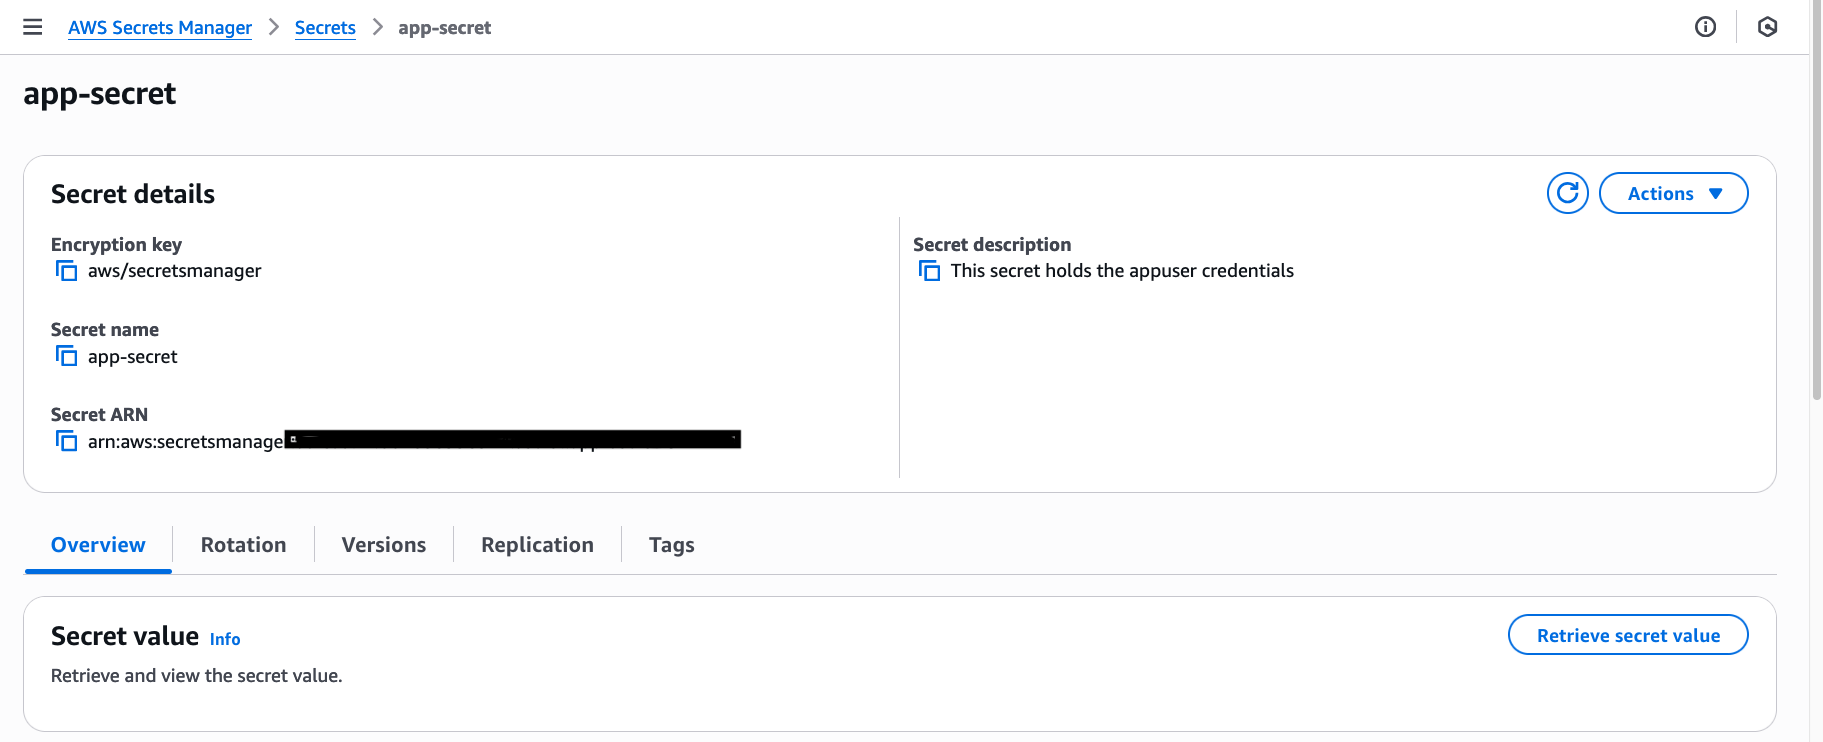
You can click on the Secret name to view the resource AWS resource name (ARN), which will be used in the IAM trust policy. You can also retrieve the Secret value by clicking Retrieve secret value (Figure 3).
Configure the AWS IAM role with the trust policy, which will include the OpenShift Service Account details.
Create the IAM trust policy. This trust policy will include the following:
- The OpenShift OIDC (OpenID Connect Identity Provider) feature allows users to authenticate AWS API calls with supported identity providers.
- The OpenShift Service Account name along with the namespace name to facilitate the authentication using the OpenShift OIDC on the OpenShift cluster for pulling the external secrets operator secret in the targeted namespace.
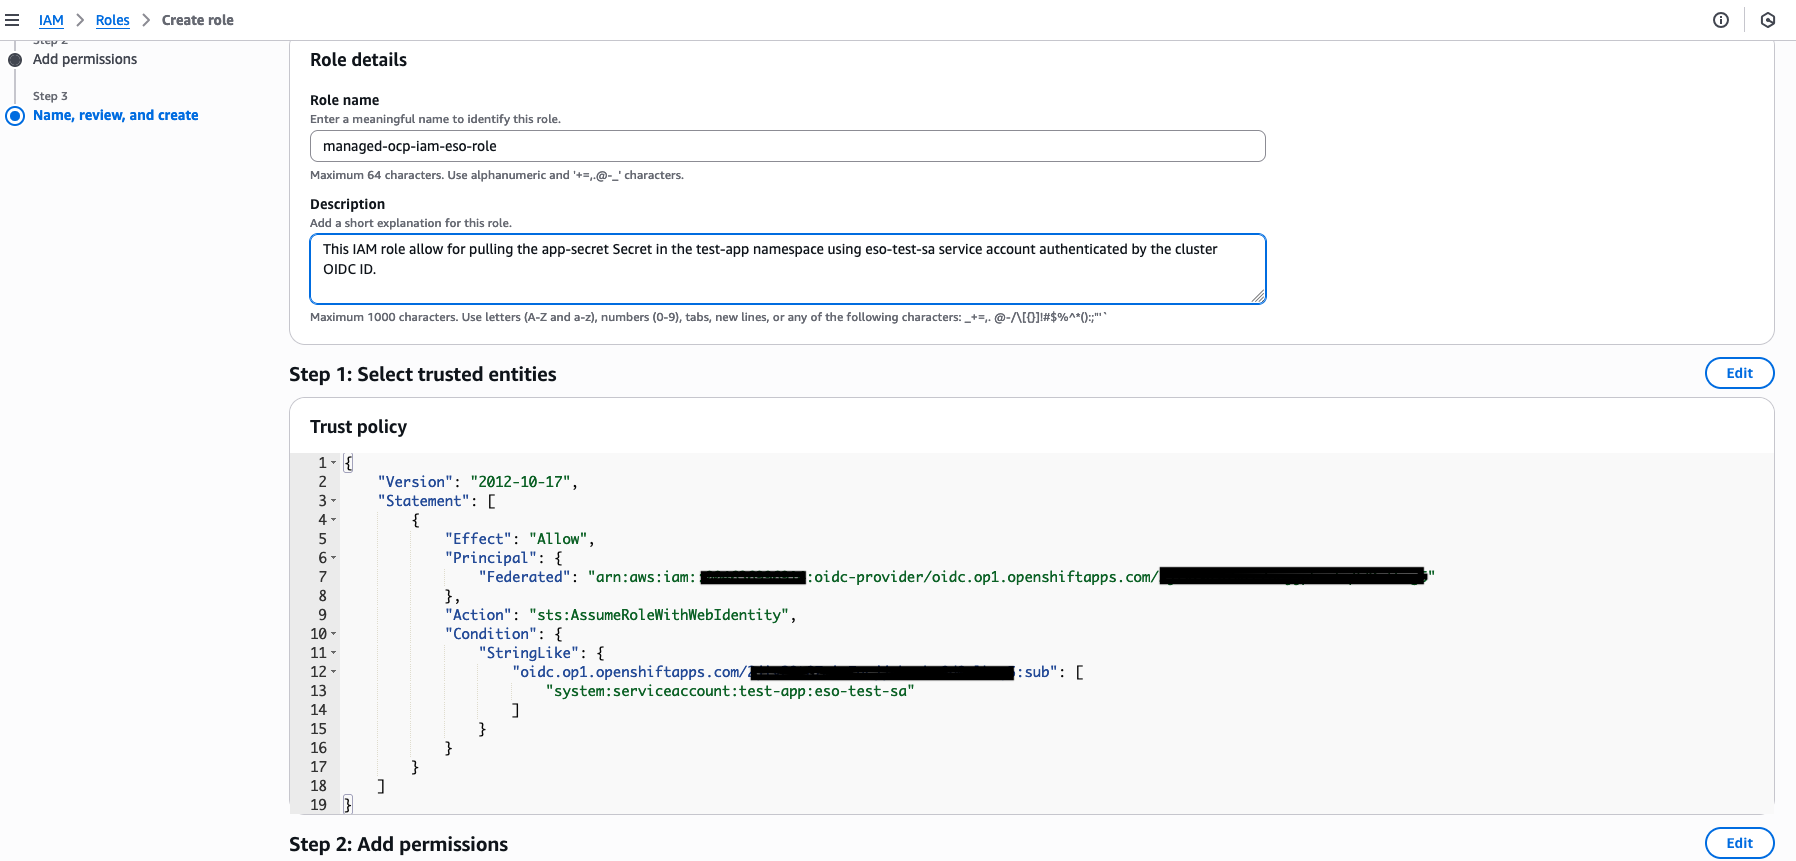
In AWS console, navigate to IAM service. On the left panel under Access Management, click on Roles and Create role, then select the Custom trust policy box. Under the Custom trust policy section, add the following trust policy:
{
"Version": "2012-10-17",
"Statement": [
     {
         "Effect": "Allow",
         "Principal": {
             "Federated": "arn:aws:iam::ACCOUNT_ID-XXXXX:oidc-provider/oidc.op1.openshiftapps.com/OIDC_ID-XXXXX"
         },
         "Action": "sts:AssumeRoleWithWebIdentity",
         "Condition": {
             "StringEquals": {
                 "oidc.op1.openshiftapps.com/OIDC_ID-XXXXX:sub": "system:serviceaccount:test-app:eso-test-sa"
             }
         }
     }
]
}
The role name will be managed-ocp-iam-eso-role. Add your AWS account ID, OIDC ID, namespace name, and service account name, then click Create role (Figure 4).
After creating the managed-ocp-iam-rso-role role, we need the IAM policy to have the correct permissions to allow access to the Secret resource in AWS Secrets Manager.
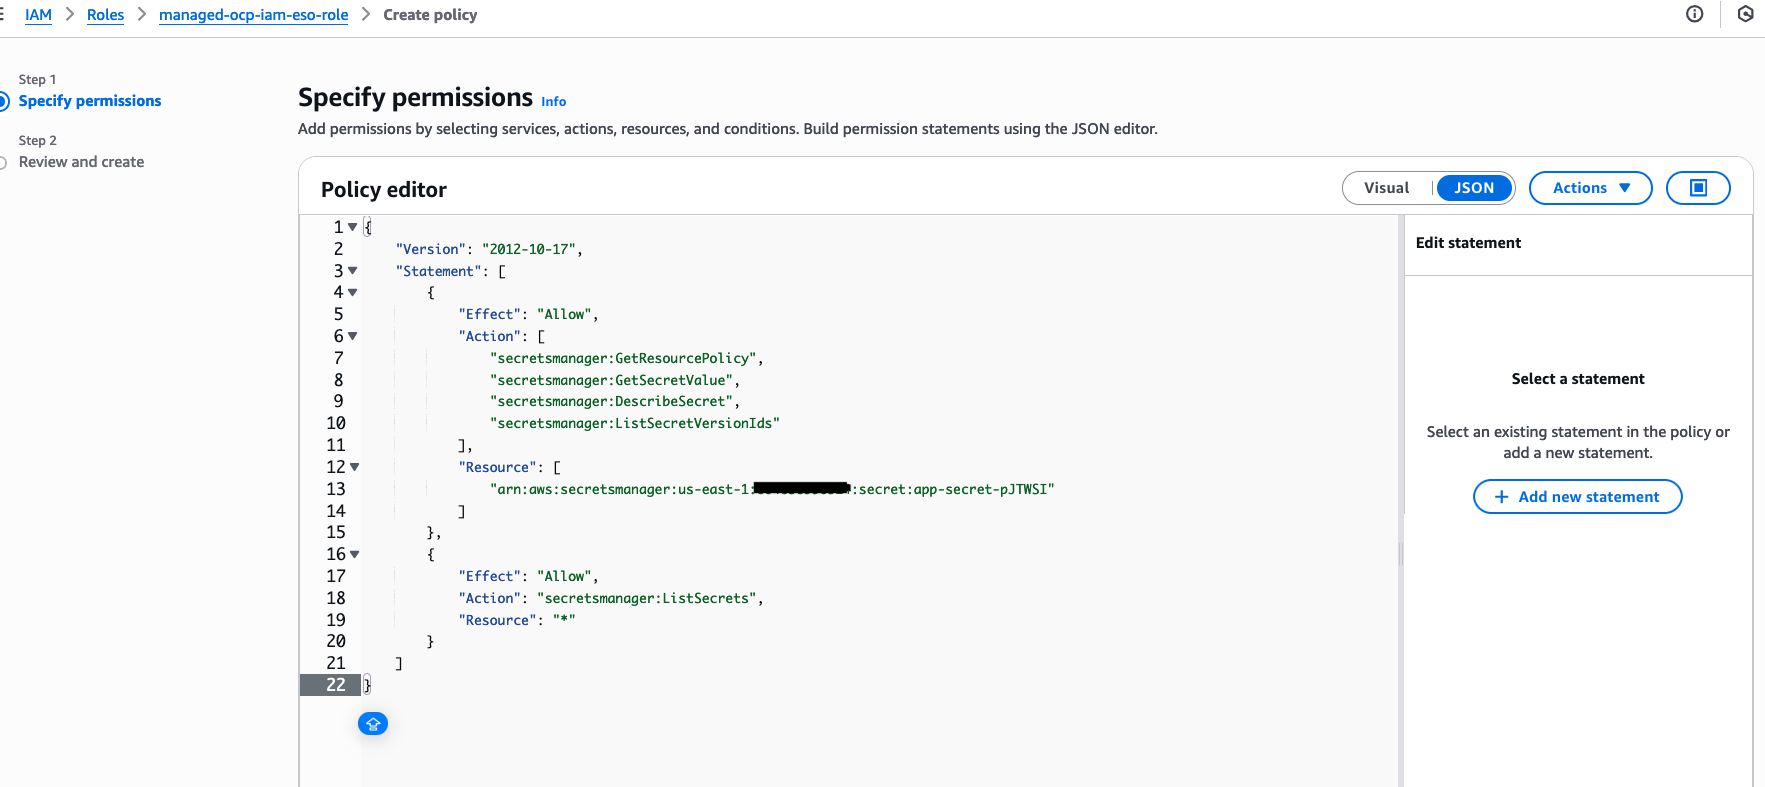
Navigate to the IAM dashboard and click policies. Create a policy with the name managed-ocp-iam-rso-role. Click Create policy. To specify the permissions on the policy editor, click JSON for JSON formatting and add the following inline policy:
{
"Version": "2012-10-17",
"Statement": [
     {
         "Effect": "Allow",
         "Action": [
             "secretsmanager:GetResourcePolicy",
             "secretsmanager:GetSecretValue",
             "secretsmanager:DescribeSecret",
             "secretsmanager:ListSecretVersionIds"
         ],
         "Resource": [
             "arn:aws:secretsmanager:us-east-1:XXaws-account-idXX:secret:app-secretXXX"
         ]
     },
     {
         "Effect": "Allow",
         "Action": "secretsmanager:ListSecrets",
         "Resource": "*"
     }
]
}
This inline policy will allow the following actions on the AWS Secrets Manager resource:
GetResourcePolicyGetSecretValueDescribeSecretListSecretVersionIds
The resource in question is the app-secret we created previously. We will refer to the secret using its ARN in the inline policy (Figure 5).
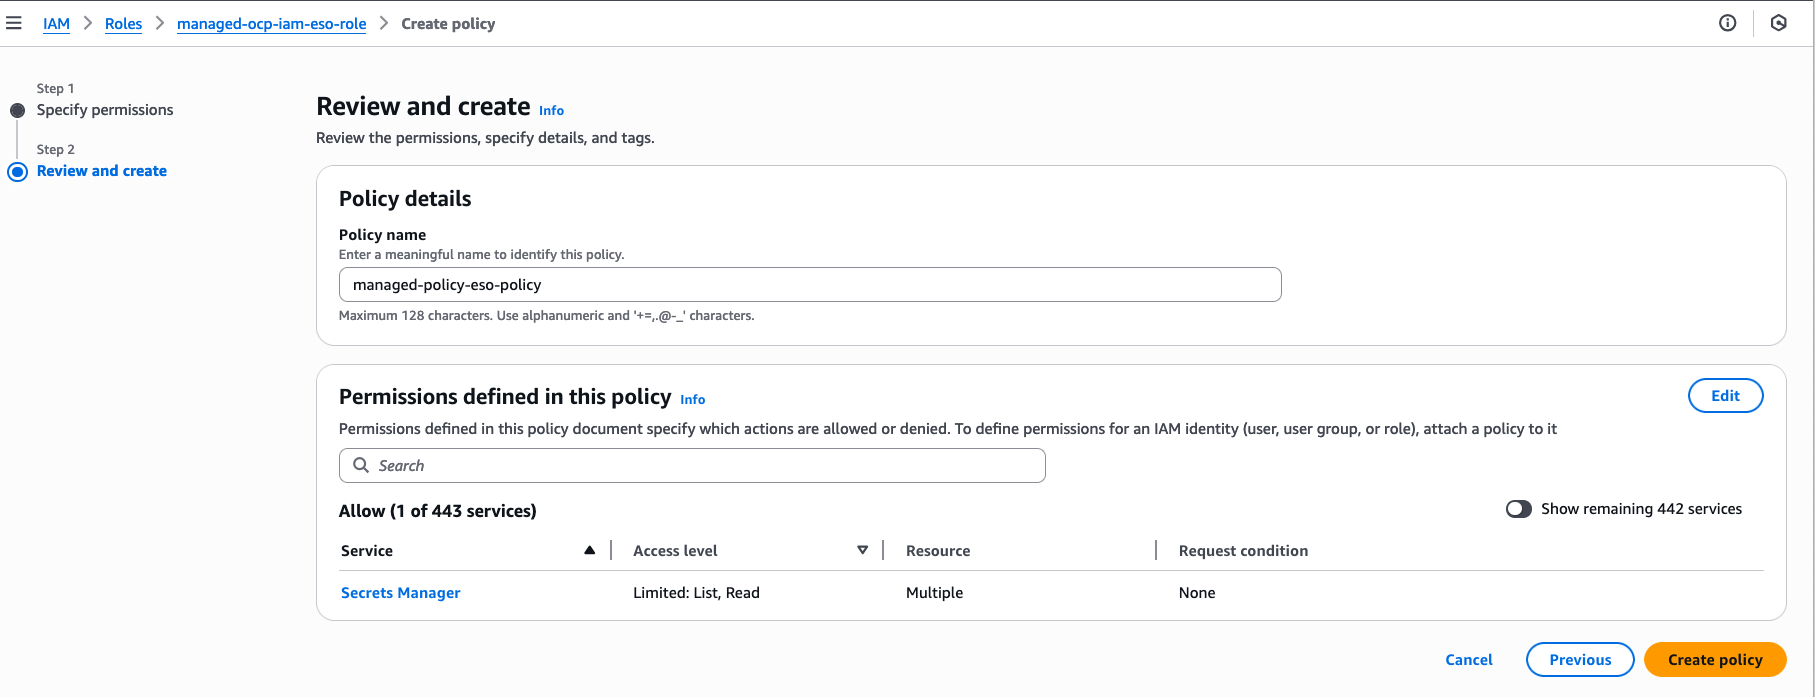
Click next, add the policy name managed-policy-eso-policy, then create the policy (Figure 6).
Attach the managed-policy-eso-policy to the managed-ocp-iam-eso-role IAM role. Under the Permissions tab, click Add permissions, then select Attach policies and choose the managed-policy-eso-policy to attach.
To attach the IAM policy to the role from the command-line interface (CLI):
# aws iam attach-role-policy --role-name <role-name> --policy-arn <policy-arn>Verify the role has the correct IAM policy attached with the following command:
# aws iam list-attached-role-policies --role-name <role-name> Verify that the IAM role managed-ocp-iam-eso-role has the inline policy attached under Permissions policies, as shown in Figure 7.
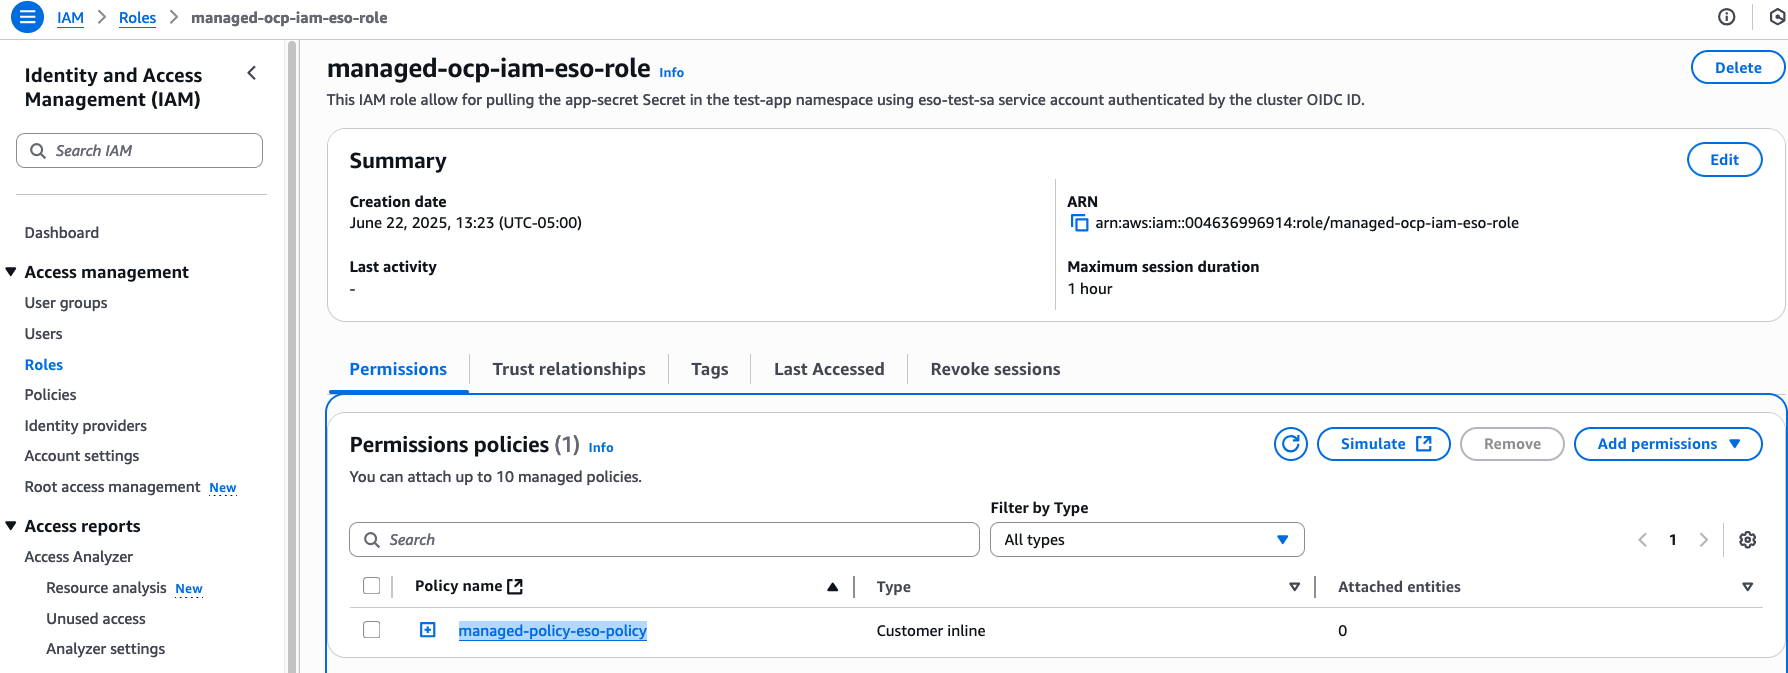
At this point, you have created a secret named app-secret in AWS Secrets Manager. You have also created an IAM role, managed-ocp-iam-eso-role, with an inline policy attached that allows it to retrieve this secret from AWS. This is accomplished by using the OpenShift cluster’s OIDC.
To verify the resources from the CLI, you can use the following commands to list the Secret in AWS Secrets Manager and the IAM role:
# aws secretsmanager list-secrets Make sure you are logged in the correct AWS region.
# aws iam get-role --role-name managed-ocp-iam-eso-role This command lists the trust policy where the OIDC ID is listed with the OpenShift Service Account.
After logging in to the OpenShift cluster from the CLI, you can use the following command to list the cluster’s OIDC ID:
# oc get authentication.config.openshift.io cluster -o jsonpath='{.spec.serviceAccountIssuer}' | sed 's|^https://||'; echoOutput:
oidc.op1.openshiftapps.com/xxxxxxxxxxxxxxxxxxxxxxxxxxxxxxConfigure the Red Hat Advanced Cluster Management policy for the external secrets operator
Create the ExternalSecret and SecretStore objects to host the details of the Secret from the AWS Secrets Manager. For more details, refer to the Red Hat Advanced Cluster Management for Kubernetes governance documentation.
You can find the example of the Red Hat Advanced Cluster Management policy for the external secrets operator here.
The first part of the Red Hat Advanced Cluster Management policy for the external secrets operator is under the acm-policies/install-eso folder:
tree acm-policies/install-eso
acm-policies/install-eso
├── config
│   └── policy-install-eso.yaml
├── external-secrets-operator
│   ├── instance
│   │   └── policy-instance.yaml
│   └── store
│    ├── policy-externalsecret.yaml
│    └── policy-secretstore.yaml
├── kustomization.yaml
├── placements
│   └── all-placement.yaml
└── policyGenerator.yaml
The SecretStore and the ExternalSecrets objects will be in the acm-policies/install-eso/external-secrets-operator/store folder.
Here is the ExternalSecret object:
apiVersion: external-secrets.io/v1beta1
kind: ExternalSecret
metadata:
  namespace: test-app
  name: app-secret
spec:
  data:
- remoteRef:
     conversionStrategy: Default
     decodingStrategy: None
     key: app-secret  ##The secret name in ocp that is stored in AWS Secret Manager
     metadataPolicy: None
     property: appuser  ##KEY1
   secretKey: appuser   ##KEY1
  refreshInterval: 1m
  secretStoreRef:
kind: SecretStore
name: app-secret-store
  target:
creationPolicy: Owner
deletionPolicy: Retain
name: app-secret   ##The secret name in ocp that is stored in AWS Secret Manager
---
Here is the SecretStore object:
apiVersion: external-secrets.io/v1beta1
kind: SecretStore
metadata:
  name: app-secret-store
  namespace: test-app  ##NAMESPACE $USER_NAMESPACE (The namespace where the OCP secret is going to be created in)
spec:
  provider:
aws:
     auth:
         jwt:
            serviceAccountRef:
              name: eso-test-sa   ##The Service Account $SA_NAME that is going to have access to the ocp secret)
              namespace: test-app ##The OpenShift namespace name where the Secret is going to live.
   region: us-east-1
   service: SecretsManager
Once these objects are created, they must be referenced in the Advanced Cluster Management policy Policy Generator file acm-policies/install-eso/policyGenerator.yaml:
 - name: external-secrets-secret-app-demo
manifests:
   - path: external-secrets-operator/store/policy-externalsecret.yaml
   - path: external-secrets-operator/store/policy-secretstore.yaml
  # ESO Store policy - end
The second part of the Advanced Cluster Management policy for the external secrets operator is at the following path: automation/roles/install_eso_from_subscription.
tree automation/roles/install_eso_from_subscription
automation/roles/install_eso_from_subscription
├── defaults
│   └── main.yaml
├── tasks
│   └── main.yaml
└── templates
└── subscription.yaml.j2- The
main.yamlfile within thedefaultsfolder contains the Red Hat Advanced Cluster Management policy application name (install-eso) and the namespace name. - The
main.yamlfile within thetasksfolder contains the OpenShift Service Account CR. This CR has an annotation that references the AWS IAM role, which has the cluster’s OIDC ID for authentication. - The
subscription.yaml.j2file under thetemplatesfolder contains the following references:- Application: Red Hat Advanced Cluster Management uses a model based on subscribing to Kubernetes resource repositories (channels) and defining placement rules to specify where the application should be deployed.
PlacementRule: APlacementRuleis often associated with aPlacementBinding, which link thePlacementRuleto the resource it will govern.
Ansible Playbook
The Ansible Playbook includes various Ansible roles that apply configurations according to the Ansible role configuration. The playbook we will use is the services-cluster-day2.yaml file, which lists the Ansible roles as tasks.
Note
For this demonstration, I have commented out the other roles in the services-cluster-day2.yaml file, leaving only the following:
install_acmadmin_create_acm_service_accountinstall_eso_from_subscription
Here is the Ansible inventory file (# ansible-eso-inventory) that was used while building the Ansible playbook:
openshift:
  hosts:
localhost:
   ansible_connection: local
  vars:
ansible_python_interpreter: '/Library/Frameworks/Python.framework/Versions/3.12/bin/python3'
aws_account_id: xxxxxxxxxxx
account_roles_prefix: Managed-OpenShift
operator_roles_prefix: Managed-OpenShift-HCP
cluster_name: xxxxxxxxxxx
cluster_short_name: xxxxxxxxxxx
region: us-east-1
vpc_cidr: x.x.x.x
private_subnet_id1: xxxxxxxxxxx
private_subnet_id2: xxxxxxxxxxx
public_subnet_id1: xxxxxxxxxxx
public_subnet_id2: xxxxxxxxxxx
compute_machine_type: m5a.4xlarge
aws_iam_role_name: managed-ocp-iam-eso-role
aws_iam_policy_name: managed-policy-eso-policy
aws_iam_policy_arn: arn:aws:iam::xxxxxxxxxxx:policy/managed-policy-eso-policy
 # Temp Cluster Auth Vars
ocp_cluster_address: xxxxxxxxxxx
cluster_admin_user: xxxxxxxxxxx
cluster_admin_password: xxxxxxxxxxx
Execute the playbook:
# ansible-playbook automation/services-cluster-day2.yaml -i /home/user/ansible-eso-inventory
###################
PLAY RECAP ****************************************************************************************************************************************************************************************************************************************************************
localhost               : ok=39   changed=15   unreachable=0 failed=0 skipped=2 rescued=0 ignored=0
After executing the playbook, the Red Hat Advanced Cluster Management policy will install the external secrets operator according to the policy configurations and create the ExternalSecrets, SecretStore, and the ServiceAccount in the test-app namespace.
Verify that the SecretStore, ExternalSecrets, SecretStore, the app-secret Secret, and the Service Account objects exist in the test-app namespace as follows:
oc get externalsecret,secretstore -n test-app
NAME                                         STORE           REFRESH INTERVAL   STATUS      READY
externalsecret.external-secrets.io/app-secret   app-secret-store   1m              SecretSynced   True
NAME                                            AGE   STATUS   CAPABILITIES   READY
secretstore.external-secrets.io/app-secret-store   42m   Valid ReadWrite   True
oc get secret app-secret -n test-app
NAME      TYPE  DATA   AGE
app-secret   Opaque   1   52s

oc get sa -n test-app eso-test-sa -o yaml
apiVersion: v1
imagePullSecrets:
- name: eso-test-sa-dockercfg-4znjr
kind: ServiceAccount
metadata:
  annotations:
eks.amazonaws.com/role-arn: arn:aws:iam::XXXXXXX:role/managed-ocp-iam-eso-role
openshift.io/internal-registry-pull-secret-ref: eso-test-sa-dockercfg-4znjr
  creationTimestamp: "2025-06-24T13:52:07Z"
  name: eso-test-sa
  namespace: test-app
  resourceVersion: "28301"
  uid: XXXXXXXXXXXXXXXXXXXXXX
secrets:
- name: eso-test-sa-dockercfg-4znjr
Note
The OpenShift Service Account eso-test-sa has annotations for the IAM role name, which has the IAM permissions policy attached to it for accessing the Secret on the AWS Secrets Manager service.
To access the Advanced Cluster Management dashboard from the OpenShift console, click the local-cluster icon in the top left corner, then select All Clusters, as shown in Figure 8.

From the Advanced Cluster Management dashboard, click the Governance tab on the left to verify the cluster is not reporting any policy violations (Figure 9).

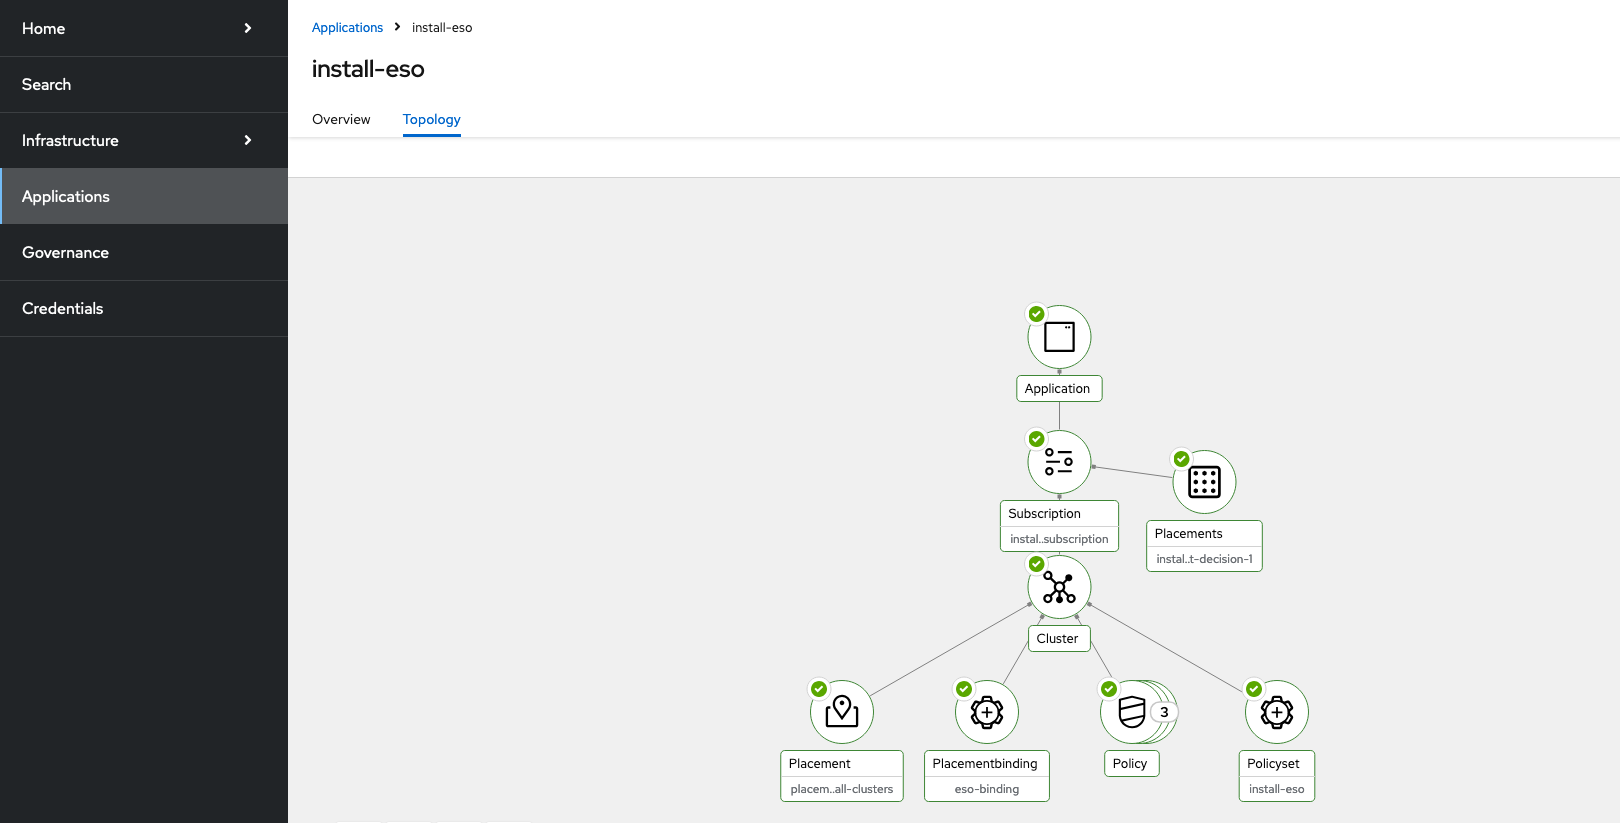
Click the Applications tab on the left and type install-eso in the search bar to check the Advanced Cluster Management policy for the external secrets operator policy (Figure 10).
Summary
Red Hat Advanced Cluster Management policies empower organizations to establish a robust and automated governance framework for their distributed OpenShift and Kubernetes environments, significantly improving operational efficiency, security, and compliance.
For more examples of Red Hat Advanced Cluster Management for Kubernetes policies managed by Ansible automation, check out the GitHub repository.
This article was a team effort. I’d like to specifically acknowledge my colleague, Skylar Scaling, whose expertise in OpenShift architecture and Ansible automation was invaluable.
The post Manage Advanced Cluster Management policies using Ansible appeared first on Red Hat Developer.