
Cloud bursting with confidential containers on OpenShift: A comprehensive guide
Introduction
Cloud bursting, the process of extending trusted environments from on-premises to the cloud using confidential computing, has become a critical aspect in cloud infrastructure management. This approach enables organizations to maintain their primary operations on-premises while leveraging the scalability of the cloud. By extending the trusted environment from on-premises to Azure cloud using confidential containers (confidential VMs) and configuring these containers for Azure, we can securely extend workloads and ensure data confidentiality and privacy. This article provides a detailed overview of the steps required to set up a cloud-bursting scenario from a Red Hat OpenShift on-premise cluster deployment to an Azure cloud using confidential containers and the Red Hat build of Trustee operator on-premises. We will also cover the setup of a site-to-site VPN, remote attestation, and the necessary OpenShift sandboxed containers and configure confidential containers for Azure. We will also discuss the configuration of the Azure private DNS zones and the steps required to enable the Confidential Containers feature gate, creating peer pods, and configuring the peer pods secret. Lastly, we will cover the steps to install the OpenShift sandboxed containers and configure the KataConfig CR to ensure the Kubernetes cluster is up and
A common use case for secure cloud bursting involves extending on-premises applications and data to a cloud environment during periods of peak demand or for specific workloads. This allows organizations to maintain their primary operations on-premises while leveraging the scalability of the cloud. Secure connectivity, often facilitated by a site-to-site VPN, enables the burst resources in the cloud to access necessary on-premises data or services as if they were part of the same network. For example, if a company’s e-commerce website experiences a surge in traffic during a holiday sale, it could spin up additional web servers in the public cloud. These servers would securely connect back to the on-premises database to handle the increased load.
Confidential computing plays a crucial role in enhancing the security of cloud bursting, especially when extending to untrusted public cloud environments. By providing hardware-level encryption and isolation for data in use, confidential computing ensures that even the cloud provider cannot access sensitive information. This is particularly important for highly regulated industries or for data that requires stringent privacy controls. When bursting workloads that handle sensitive data, confidential computing can mitigate risks associated with data exposure, allowing organizations to securely leverage public cloud resources without compromising data confidentiality.
In this article, we’ll describe detailed instructions to set up a cloud-bursting scenario from a Red Hat OpenShift on-premise cluster deployment to Azure cloud using confidential containers. The OpenShift cluster is running in an on-premise environment, and it manages workloads running on-premise and workloads running on Azure cloud leveraging confidential containers (there is no second OpenShift cluster on Azure). Further, we used OpenVPN to set up network connectivity between the on-premise datacenter and Azure cloud. This was easier to set up to demonstrate the end-to-end cloud bursting scenario and by no means indicates that this is the only way.
Solution overview
We assume that the on-premise environment is trusted, and the cloud environment is untrusted. Our goal is to extend the trusted environment from on-premise to the cloud by using confidential computing. We have deployed the OpenShift cluster in the on-premise trusted environment.
The workloads can burst to the Azure cloud by leveraging confidential containers on the Azure cloud (since it is untrusted).
Figure 1 provides an overview of cloud bursting setup.
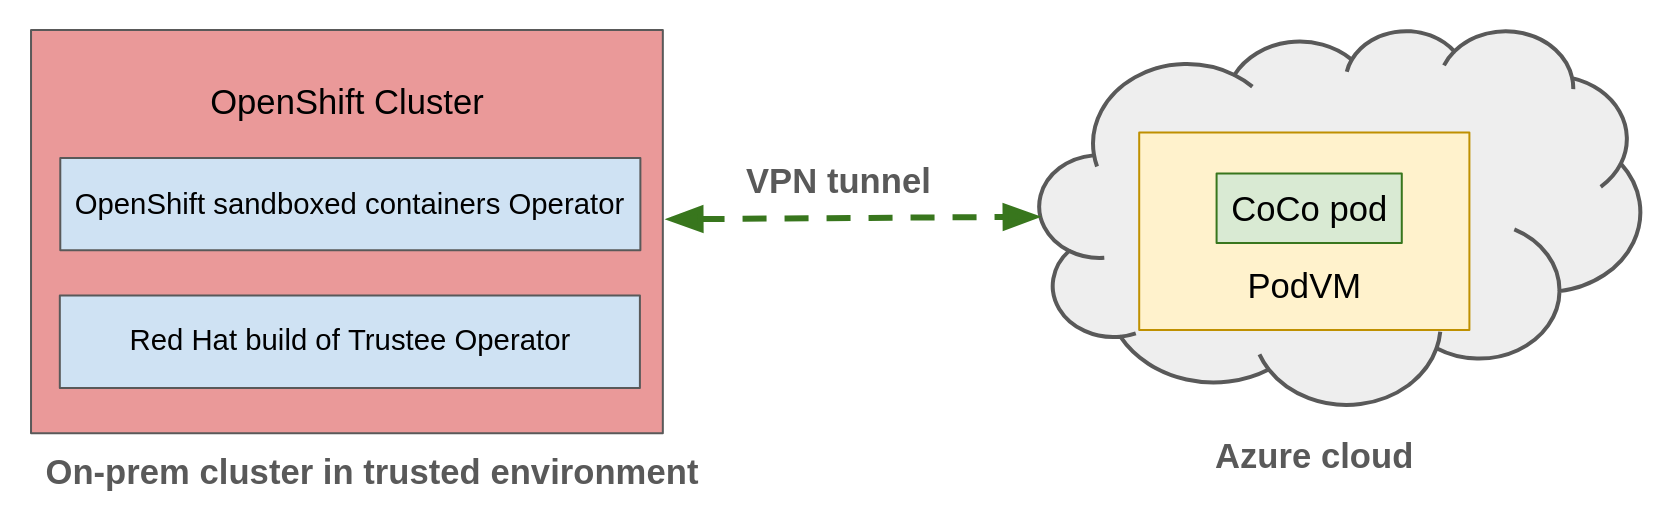
In the on-premise OpenShift cluster, we will install the OpenShift sandboxed containers Operator and configure confidential containers for Azure. We will also install the Red Hat build of Trustee operator on-premise, which provides remote attestation service for the Azure confidential containers. When you create a cloud bursting workload, a cloud CVM instance (i.e., a confidential VM) boots in Azure for running the pod. The attestation service running in the on-premise environment will validate the confidentiality and trustworthiness of the Azure environment.
Networking requirements
For cloud-bursting to work from an on-premise environment to the cloud, bi-directional network connectivity must exist between the two environments.
In this article, for bi-directional networking connectivity between an on-premise environment and Azure cloud, we’ll use a site-to-site VPN using OpenVPN. Site-to-site VPN provides the required bi-directional connectivity between the two environments.
Using OpenVPN for site-to-site VPN is just an example. Refer to Azure documentation for VPN devices and other related details regarding site-to-site VPN.
Figure 2 shows the end-to-end overview of the cloud bursting solution.

We have the following hardware and software requirements for site-to-site VPN setup using OpenVPN.
Hardware requirements:
- A dedicated cloud instance for the VPN server. This cloud instance must be on the same subnet as the pod VMs.
- A dedicated on-premise host (e.g. a VM) for the VPN client (gateway). This on-premise host must be in the same subnet as the OpenShift worker nodes.
Software requirements:
- OpenVPN Access Server installed on the dedicated cloud instance.
- OpenVPN Client (acting as the gateway) installed on the dedicated on-premise host.
VPN topology
We build the VPN tunnel using one dedicated Azure cloud instance running the OpenVPN Access Server and one dedicated on-premise host running the OpenVPN Client.
The Figure 3 shows an example of the site-to-site VPN topology with OpenVPN.
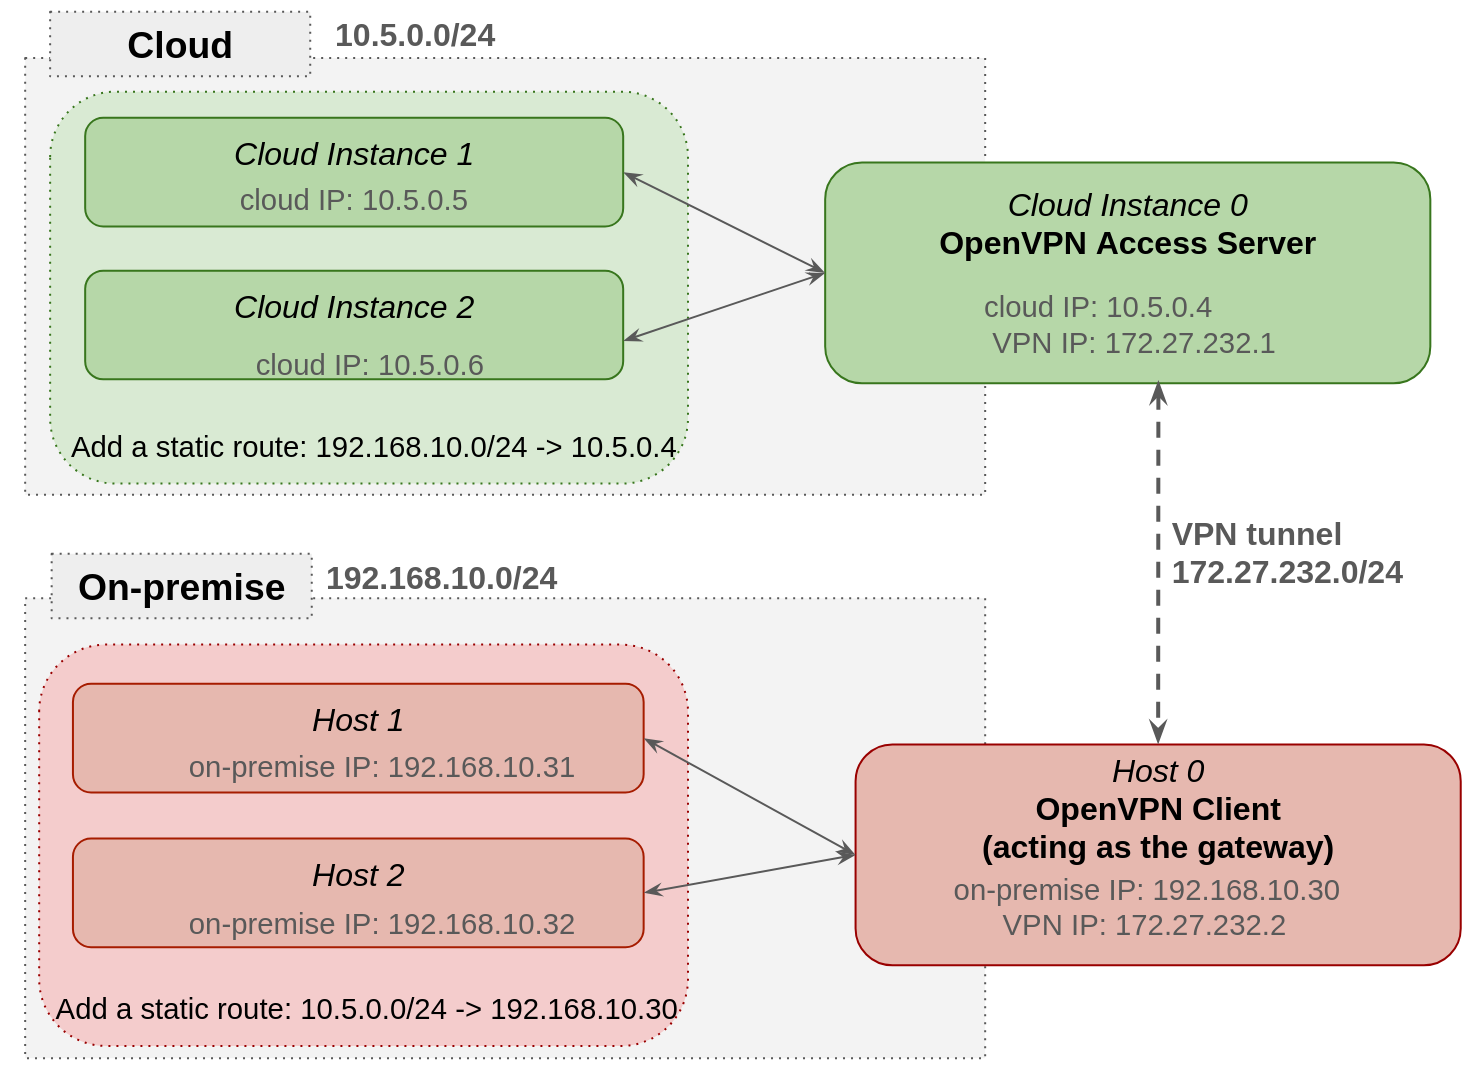
There are three subnets:
- Cloud subnet: It’s using 10.5.0.0/24.
- On-premise subnet: It’s using 192.168.10.0.
- VPN subnet: It’s using 172.27.232.0/24.
The OpenVPN Access Server has both IP 10.5.0.0.4 from the cloud subnet and IP 172.27.232.1 from the VPN subnet. The OpenVPN Client has both IP 192.168.10.30 from the on-premise subnet and IP 172.27.232.2 from the VPN subnet.
We add static routes on both cloud instances and on-premise hosts to use the VPN tunnel. For cloud instances, we add a route to access the on-premise subnets via the OpenVPN Access Server: 192.168.10.0/24 -> 10.5.0.4.
For on-premise hosts, we add a route to access the cloud subnets via the OpenVPN Client: 10.5.0.0/24 -> 192.168.10.30.
So what’s the network packet flow when the cloud instances are accessing the on-premise hosts? Let’s take the Cloud Instance 1 accessing on-premise Host 1 as an example. The Cloud Instance 1 has the IP 10.5.0.5, and the on-premise Host 1 has the IP 192.168.10.31.
- Following the static route in Cloud Instance 1, when accessing the on-premise subnet 192.168.10.0/24, the next hop is 10.5.0.4 which is the OpenVPN Access Server IP. So the packets go to the OpenVPN Access Server first.
- When the network packets arrive at OpenVPN Access Server, the packets route to the VPN tunnel following the OpenVPN setup (route and IP forwarding setup). So the packets go to the OpenVPN Client via VPN tunnel next.
- Now the network packets arrive at OpenVPN Client which is in the same subnets with the Host 1. The on-premise physical routers will route the packets. So the packets can go to the destination Host 1.
For the on-premise Host 1 accessing the Cloud Instance 1 is vice versa:
- Following the static route in on-premise Host 1, when accessing the cloud subnet 10.5.0.0/24, the next hop is 192.168.10.30 which is the OpenVPN Client. So the packets go to the OpenVPN Client first.
- When the network packets arrive at OpenVPN Client, the packets will be routed to the VPN tunnel following the OpenVPN Client setup (allowing the VPN Client to act as VPN gateway for the on-premise subnets, route and IP forwarding setup). From there the packets go to the OpenVPN Access Server via VPN tunnel next.
- Now the network packets arrive at OpenVPN Access Server which is in the same subnets with the Cloud Instance 1. The packets will be routed by cloud routers. So the packets can reach the destination Cloud Instance 1.
Solution setup
This section describes the detailed steps to deploy the cloud bursting solution. We will cover VPN setup, remote attestation setup, OpenShift sandboxed containers, and configure confidential containers for Azure setup.
VPN setup (optional)
You can ignore this step if you already have a bi-directional network connectivity between the on-premise environment and Azure cloud.
Here are the high level steps to set up the VPN:
- Create a resource group and virtual network in Azure.
- Boot an Azure cloud instance from the resource group and virtual network.
- Install OpenVPN Access Server on this cloud instance.
- Set up the OpenVPN Access Server.
- Create a VPN Client.
- Set up the VPN Client acting as the gateway.
- Install OpenVPN Client on an on-premise RHEL 9 host.
- Connect the OpenVPN Client to Access Server.
- Set up routes in both subnets to allow connecting to each other.
- Enable IP forwarding in OpenVPN Access Server and VPN Client.
Azure resource creation
You must have an Azure account with permissions to create resources including virtual machines and virtual network.
(1) Create a resource group in Azure.
The resource group we create here will be used to start Pod VMs and the instance which runs the OpenVPN Access Server. Please pay attention to the region of the resource group. For cloud bursting, the pod VM needs to be a confidential cloud VM (TDX or SNP), so we need to choose a location which supports these kinds of VMs.
Click Home -> Resource groups -> + Create. Input the Subscription, Resource group name and Region. Then click Review + create to finish the creation.
For example, we created a cloud-bursting-rg resource group in the region of North Europe.
(2) Create a virtual network in Azure.
All the pod VMs and the instance which runs the OpenVPN Access Server will be attached with this virtual network, so that they will be in the same subnet.
- Click Home -> Virtual networks -> + Create first.
- On the Basics tab, input the Resource group as the same one we created in the previous step, Virtual network name and Region as the same one we used in previous step. For example, we created a virtual network name cloud-bursting-vnet under cloud-bursting-rg resource group and North Europe region.
- In the IP addresses tab, keep the default IP address pool or input the range you want. For example, we input 10.5.0.0/24 as the default subnets.
- For other tabs like Security, Tags, we can keep default values.
- Then click Review + create to finish the creation.
OpenVPN Access Server
The OpenVPN Access Server software is available in multiple cloud platforms including Azure, AWS and GCP cloud etc. We can set up the OpenVPN Access Server following the next three steps.
Step 1: Boot a cloud instance with OpenVPN Access Server initialized.
- Go to Home -> Marketplace -> search “openvpn access server”. There are several results in the list, let’s choose the one “OpenVPN Access Server” provided by “OpenVPN Inc”. Click Create, the page goes to Create a virtual machine page.
- In the Basics tab, input the Resource group and Region as the one we used in the previous step. Keep the default Image OpenVPN Access Server – x64 Gen1 as it is. Also you need to fill in the Virtual machine name, Size, Username, Password or SSH public key etc. For example, we create a Virtual machine name as cloud-bursting-openvpn-server with Standard_D2as_v5 image size.
- In the Disks tab, keep the default values.
- In the Networking tab, keep the default values. Please notice that the Virtual network of default is one we created in the previous step, this is expected. If it’s not the one please change it to. It’s ok to keep default values for others. Note: For the Configure network security group(NSG), a new network security group will be created with preconfigured NSG rules. We need to note this NSG which will be used for the peer pods configmap setup.
- In the Management, Monitoring, Advanced, Tags tab, keep the default values as they are.
- Click Review + create to finish the creation.
Step 2: Initialize the OpenVPN Access Server with first ssh login.
- Go to Home -> Virtual machines -> $VM_name. Check the Public IP address. We will use this public IP to login the VM and also login the OpenVPN Access Server web UI page.
- The first ssh login will lead us to the OpenVPN Access Server Appliance installation process. Input the value after each prompt until the initialization is finished. In our example setup, we choose the default values for all items. When the initialization finishes, please check the initialization summary output and record the account and password which we will use to login the OpenVPN Access Server Admin page.
Step 3: Log into the OpenVPN Access Server admin web page https://$public_ip/admin/ and set up the VPN.
- The Status Overview page shows the current configuration. We can see that Current Active users number is 0. After one VPN client is connected, this value will become 1.
- Go to the CONFIGURATION -> VPN Settings page. In the Routing section, please choose “Yes, using Routing” for the “Should VPN clients have access to private subnets (non-public networks on the server side)?” In the “Specify the private subnets to which all clients should be given access (one per line):”, it’s default using the virtual network subnets 10.5.0.0/24 we created. That’s expected and we don’t need to do any change. This is the Azure cloud subnet.
- Then scroll down to the bottom of this page, click Save Settings.
- Next the page will automatically scroll up to the top of this page, click Update Running Server to apply this change.
Create a VPN Client
- In the OpenVPN Access Server Admin page, go to the USER MANAGEMENT -> User Permissions to add a new user.
- Input the Username (eg. vpn-client-gateway), Click the Allow Auto-login.
- Then Click More Settings: 1) In the VPN Gateway section, set Configure VPN Gateway: as Yes. 2)In the Allow client to act as VPN gateway for these client-side subnets:, input the subnets on prem. For example, 192.168.10.0/24.
- Then scroll down to the bottom of this page, click Save Settings.
- Next the page will automatically scroll up to the top of this page, click “Update Running Server” to apply this change.
Download the VPN Client User file
- In the OpenVPN Access Server Admin page, go to the USER MANAGEMENT -> User Profiles. Click the Create Profile to download the client profile.
- Click Autologin before downloading.
- Download
Modify the OpenVPN client profile
- Open the profile download in the previous step, replace the Azure private IP of the OpenVPN Server with Azure public IP. We need this change because the VPN client on-premise subnets cannot access the private IP of Azure before connecting.
- After finishing the modification, let’s save this profile and we will use it in the OpenVPN Client setup.
- Install openvpn client package on the on-premise host
The following is an example to install the OpenVPN Client on a Red Hat Enterprise Linux 9 host.
# dnf  install -y  https://dl.fedoraproject.org/pub/epel/epel-release-latest-9.noarch.rpm
# dnf install https://packages.openvpn.net/openvpn-openvpn3-epel-repo-1-1.noarch.rpm
# dnf install openvpn3-client
Import OpenVPN client profile and set it as default enabling service of the system.
Copy the OpenVPN client profile we generated in the previous step, put it to the server of the VPN client, let’s call it azurevpnclient.ovpn. Following this guide, the steps are:
Import the client profile to the configuration manager as follows.
# openvpn3 config-import --config /etc/openvpn3/azurevpnclient.ovpn --name CloudConnexa --persistentGrant the root user access to the imported CloudConnexa connection profile.
# openvpn3 config-acl --show --lock-down true --grant root --config CloudConnexaEnable the OpenVPN session service as default when the system is booting.
# systemctl enable --now openvpn3-session@CloudConnexa.serviceNow let’s log in the OpenVPN Access Server Admin page, go to the STATUS -> Status Overview. We can see the Current Active Users is 1. Great, the OpenVPN Client has connected to the access server.
Route configuration
We need to add a static route table on both Azure and on-premise. When accessing from Azure instance to on-premise host, the first hop of the route needs to be OpenVPN Access Server IP. When accessing from on-premise host to Azure instance, the first hop of the route needs to be the OpenVPN Client IP.
To set up a route in Azure, follow these steps:
- Create a route table. Go to Home -> Route tables -> + Create, Input the Resource group and Region as the ones we used for the Azure Virtual network in previous setup. Also fill in the Name. Click Review + create/Create to finish the creation.
- Add routes. Go to Home -> Route tables, open the route table you created in the previous step. Go to Settings -> Routes -> + Add to add a route. Input the Route name, choose Destination type as IP Addresses, input the Destination IP addresses/CIDR ranges as the private subnets of on prem. Choose Next hop type as Virtual appliance. Input the Next hop address as the Azure private IP of OpenVPN Access Server. Click Add to finish the adding.
- Attach the routes to the subnets of the Virtual network we created and used in above steps. Go to Home -> Virtual networks, open the virtual network we created, eg: cloud-bursting-vnet. Next go to Settings -> Subnets -> default, in the Edit subnet page, choose the Route table we created. Then click Save.
We also need to set up routes on-premise. Remember that we need to re-do the route set after each system reboot.
Modify the route table of the OpenVPN Client host. Delete the default route 0.0.0.0/1 and add route to Azure subnets only.
Check the default route table after the OpenVPN Client service is enabled. We can see there is a route to 0.0.0.0/1 for all subnets, and we need to change it to Azure subnet only. After this change, the on-premise subnets will be able to access the OpenVPN Client host. We only need to route the Azure subnets across the VPN tunnel.
# ip route
0.0.0.0/1 via 172.27.232.1 dev tun0
...
# ip route delete 0.0.0.0/1 via 172.27.232.1 dev tun0
# ip route add 10.5.0.0/24 via 172.27.232.1 dev tun0In some cases the IP of the OpenVPN client changed and we need to delete the 0.0.0.0/1 route and change it to Azure subnet again.
On other hosts on-premises, we need to add a static route to the route table. The next hop should be the on-premise private IP of OpenVPN Client host. It should looks like:
# ip route add $azure_private_subnets_ip_range via $on_prem_vpn_client_private_ipFor example:
# ip route add 10.5.0.0/24 via 192.168.10.30After each reboot, we need to add the route again. For example, after installing the KataConfig when performing OpenShift sandboxed containers operator setup, the worker node will reboot, we will need to re-add the route setup in the worker node.
Enable IP forwarding
IP forwarding allows a system to transfer IP packets from one network to another. The system acts as a router. For the OpenVPN Access Server and Client, the IP packets can be routed between the physical network and VPN virtual network, so when the physical network device receives the packets, they can be routed to the VPN tunnel and vice versa.
For the OpenVPN Access Server VM, here is the way to enable IP forwarding of the network:
- Go to Home -> Virtual machines, open the VM you created for OpenVPN Access Server, eg: cloud-bursting-openvpn-server.
- Then go to Networking -> Network settings, click Network interface in the Essentials tab.
- Next go to Settings -> IP configurations, check Enable IP forwarding. Click Apply.
For the OpenVPN Client server, we can enable IP forwarding of the Network cards using the following command:
# echo "net.ipv4.ip_forward=1" >> /etc/sysctl.conf
# sysctl --system
Azure private DNS zones
If we deploy private web applications on-premise, we need to map name/IP to Azure so that the Azure instance can access the web name on-premise. For example, in the cloud bursting use case, we deploy the Red Hat build of Trustee operator on-premise, we have to map the on-premise Trustee route name/IP to Azure so the Confidential Containers in Azure could access to the Trustee route.
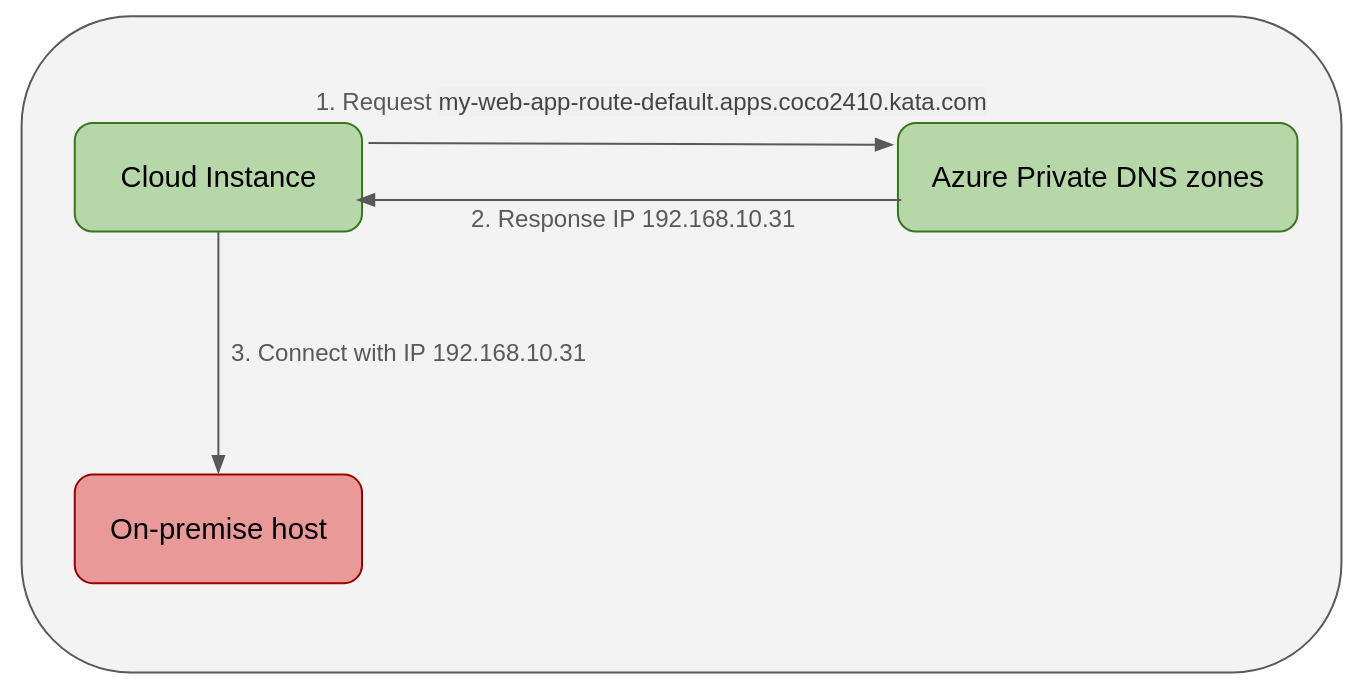
This section describes how to add a private name/IP to Azure instances. Figure 4 shows the network topology of cloud instances accessing on-premises applications with Azure Private DNS zones. When the cloud instance requesting accessing web my-web-app-route-default.apps.coco2410.kata.com deployed on an on-premise host, it will go to the Azure private DNS zones to get the IP, then connect the on-premise host with IP.
Follow these steps:
- Create Private DNS zones. Go toHome -> Private DNS zones -> + Create. Input the Subscription, Resource group name and Instance Name. Then click Review + create. For example, we created a kata.com DNS zone under the cloud-bursting-rg. Please note that the Resource group should be the same as we plan for site-to-site VPN.
- Add Virtual Network link to the DNS. Go to the DNS zone we created, like kata.com. Then go to DNS management – > Virtual Network Links -> + Add. Input the Link name, Virtual Network and check Enable auto registration, click Create.
- Add DNS records. Open the DNS zone we created, like kata.com. Go to DNS management – > Recordsets -> + Add. Input the Name, IP address, then click Add.
Now the DNS is set up ready. To test the DNS, let’s create a VM in Azure, then curl the web application deployed on one on-premise host.
$ curl my-web-app-route-default.apps.coco2410.kata.com
Service handled by pod on-prem-deployment-547f787996-wfds4
Remote attestation
In the cloud bursting setup, the Red Hat build of Trustee operator installed in the on-premise environment provides the remote attestation service for the confidential containers on Azure.
To set up Trustee in the on-premise environment, we can perform the following steps similar to the documentation which describe steps to deploy the Trustee in Azure:
1. Installing the Red Hat build of Trustee operator in your on-premise OpenShift cluster
2. Creating the Trustee config map
3. Creating the RVPS config map
4. Creating the attestation policy config map
5. Creating the Trustee authentication secret
6. Creating a TDX config map if you use Trust Domain Extensions (TDX)
7. Creating a secret with custom keys for clients
8. Creating a secret for container image signature verification
9. Creating the container image signature verification policy
10. Creating the resource policy config map
11. Creating the Trustee authentication secret
12. Creating the KbsConfig custom resource
Please note that you need to uncomment tdxConfigSpec.kbsTdxConfigMapName: tdx-config if you are deploying TDX CoCo pod.
13. Creating the Trustee cluster route
For this step, It’s necessary to mention the Trustee route setup which has a bit of a difference:
If we create a secure route with TLS termination (https route), we need to add the certs to the pod VM initdata. Otherwise, we can create an HTTP-based route for Trustee by performing the following steps:
# oc expose svc kbs-service --port kbs-port -n trustee-operator-system
route.route.openshift.io/kbs-service exposed

# oc get routes -n trustee-operator-system
NAME      	HOST/PORT                                                	PATH   SERVICES  	PORT   	TERMINATION   WILDCARD
kbs-service   kbs-service-trustee-operator-system.apps.coco2410.kata.com      	kbs-service   kbs-port             	None

# TRUSTEE_HOST=$(oc get route -n trustee-operator-system kbs-service \
  -o jsonpath={.spec.host})

# echo $TRUSTEE_HOST
kbs-service-trustee-operator-system.apps.coco2410.kata.com
Then the Trustee route will be http://kbs-service-trustee-operator-system.apps.coco2410.kata.com. In the next chapter, OpenShift sandboxed containers and configure confidential containers for Azure setup in step 7. Creating initdata, we can set the <trustee_url> as http://kbs-service-trustee-operator-system.apps.coco2410.kata.com.
As we deploy the Trustee in the on-premise environment, we need to add the on-premise trustee route to the Azure DNS private zones, so the Pod VM could be able to access on-premise trustee web service by name. We can follow the steps in described in the chapter, “Azure Private DNS zones.”
For example, we created a Trustee route kbs-service-trustee-operator-system.apps.coco2410.kata.com. Then in Azure, we need to add a record set kbs-service-trustee-operator-system.apps.coco2410 to the kata.com DNS.
14. Updating the RVPS config map
15. Verify the Trustee configuration
Configure confidential containers for Azure
We install the OpenShift sandboxed containers on the on-premise OpenShift cluster and configure confidential containers for Azure.
To set up OpenShift sandboxed containers and configure confidential containers for Azure, we can perform the following steps which are generally from Deploying OpenShift sandboxed containers on Azure and Deploying Confidential Containers on Azure.
1. Configuring outbound connections
There are some differences we need to pay attention to.
For the AZURE_RESOURCE_GROUP environment variable, please set the value as the Azure resource group which was created and used in the VPN setup. For example:
AZURE_RESOURCE_GROUP=cloud-bursting-rgFor the AZURE_SUBNET_ID environment variable, we need to replace ‘worker’ as ‘default’ like the following command, as in the VPN setup, we created the subnet name with ‘default’ name. If you set other values, please change it in this command accordingly.
AZURE_SUBNET_ID=$(az network vnet subnet list \
	--resource-group "${AZURE_RESOURCE_GROUP}" \
	--vnet-name "${AZURE_VNET_NAME}" --query "[].{Id:id} \
	| [? contains(Id, 'default')]" --output tsv)
2. Installing the OpenShift sandboxed containers Operator
3. Set up peer pods with Azure provider by adding the "PROVIDER_OVERRIDE: azure" environment variable to the OpenShift sandboxed containers Operator cluster service version(CSV).
For cloud bursting, the difference which is also the key point is adding the "PROVIDER_OVERRIDE: azure" environment variable to the OpenShift sandboxed containers peer pods.
After installing the OpenShift sandboxed containers Operator, we need to update the CSV with adding the "PROVIDER_OVERRIDE: azure" environment variable before configuring peer pods and creating KataConfig.
We can apply this change by performing the below oc command, it’ll add a new object "name":"PROVIDER_OVERRIDE","value":"azure" to the env.
# oc patch csv sandboxed-containers-operator.v1.10.1 -n openshift-sandboxed-containers-operator --type "json" -p '[
{"op":"add","path":"/spec/install/spec/deployments/0/spec/template/spec/containers/0/env/-","value":{"name":"PROVIDER_OVERRIDE","value":"azure"}}]'
Or we can apply this change by editing the csv manually, both methods have the same results.
# oc edit csv -n openshift-sandboxed-containers-operator sandboxed-containers-operator.v1.10.1Search for RELATED_IMAGE_CAA, you will see name value pairs under env. Add a new env variable PROVIDER_OVERRIDE as follows.
command:
                - /manager
                env:
                - name: PEERPODS_NAMESPACE
                  value: openshift-sandboxed-containers-operator
                - name: RELATED_IMAGE_KATA_MONITOR
                  value: registry.redhat.io/openshift-sandboxed-containers/osc-monitor-rhel9@sha256:f287a1d6818d9e0aadc8ff21a003fa0dfbdee8bbd01e3acb322afe55d5e7e9bf
                - name: SANDBOXED_CONTAINERS_EXTENSION
                  value: sandboxed-containers
                - name: PROVIDER_OVERRIDE
                  value: azure
                - name: RELATED_IMAGE_CAA
                  value: registry.redhat.io/openshift-sandboxed-containers/osc-cloud-api-adaptor-rhel9@sha256:b92928ae2bd615c2e2b81f75a27cb2c65e232e6c726ecdaf792dba10cce17e3c
                - name: RELATED_IMAGE_PEERPODS_WEBHOOK
4. Creating the peer pods secret
5. Enabling the Confidential Containers feature gate
6. Configuring the pull secret for peer pods
Please note that we need to set the <trustee_url> as the route we created in the chapter “Remote attestation” in step 13. Creating the Trustee cluster route. For example, we can set it as url = 'http://kbs-service-trustee-operator-system.apps.coco2410.kata.com'.
8. Creating the peer pods config map.
We have to set the AZURE_RESOURCE_GROUP, AZURE_REGION, AZURE_SUBNET_ID as we created in the VPN setup. And set AZURE_NSG_ID as the network security group created during the process to launch OpenVPN Access Server VM.
For the AZURE_RESOURCE_GROUP and AZURE_SUBNET_ID environment variables, please see step 1 in this section.
For AZURE_REGION and AZURE_NSG_ID environment variables, we can retrieve them following the commands in the doc.
Additionally, please note that we don’t need to restart the ds/osc-caa-ds daemon set following the current steps.
10. Creating the KataConfig CR
After this step, the worker node will be rebooted, remember that we need to re-add the static route following section “Route configuration” step (2).
11. Verifying the attestation process
Wrap up
This article demonstrated how to set up a cloud bursting environment between on-premise and Azure cloud using confidential containers. It covers the site-to-site VPN setup between on-premise subnet and Azure cloud subnet and the required remote attestation and OpenShift sandboxed containers setup.
The post Cloud bursting with confidential containers on OpenShift appeared first on Red Hat Developer.