
The standard Red Hat OpenShift installer-provisioned infrastructure (IPI) process on Amazon Web Service (AWS), while effective, often relies on broad, administrator-level credentials. This practice grants a wider set of permissions than necessary, posing a potential security risk.
This guide presents a more secure installation method that significantly narrows the permission scope. By leveraging the cloud credential operator utility ccoctland setting credentials mode to manual, you can pre-create narrowly-defined IAM roles for all cluster components. This approach eliminates the need for long-lived AWS access keys, relying instead on short-term AWS security token service (STS) credentials.
Furthermore, the process utilizes the ccoctl --dry-run feature, which allows you to generate and audit all required IAM policies before applied, ensuring a true least-privilege model from the outset.
For this article, we assume about the readers:
- Use no long-lived IAM access key/secret.
- You have permission to run ccoctl and create your own IAM roles.
- You are familiar with the extra considerations manual mode may entail.
- Details that identify a specific AWS account have been replaced with generic values.
- Master nodes are referred to as controlPlane nodes.
- The code and configuration mentioned in this article were tested on OpenShift 4.19.
Understanding the IAM framework
An OpenShift IPI installation on AWS involves four key points of interaction with AWS Identity and Access Management (IAM). Understanding these is crucial for configuring a least-privileged environment.
- Installation host (jump host)
The machine where you run theopenshift-installandccoctlcommands requires a specific set of IAM permissions to create and manage AWS resources. In this guide, we satisfy this by attaching a custom IAM role to an EC2 instance that serves as this installation host. - Cloud credential operator utility (ccoctl)
This utility creates the necessary IAM roles that will be assumed by OpenShift operators using AWS STS and Web Identity Federation (which authenticate via OIDC identity provider, also created by ccoctl). The--dry-runoption is invaluable, as it generates the identity and policy artifacts for review by an AWS administrator before any resources are actually created. - Cluster nodes (ControlPlane and worker)
The EC2 instances that function as controlPlane and worker nodes each require an IAM instance profile. These profiles grant permissions needed for day-to-day cluster operations, such as managing storage volumes and load balancers. - Cluster operators
Once the cluster is running, various OpenShift operators need to interact with the AWS API. They do this by assuming the roles you create with ccoctl, ensuring they only have the permissions required for their specific function.
Steps are adopted from [1]
Create IAM roles
You need to create an IAM role for the OpenShift Installer and ccoctl with the required permission policy and trust relationship for the EC2 host running the installer and ccoctl. Refer to the documentation for installer permissions and ccoctl permissions.
Policy (installer and cocctl permissions merged):
{
    "Version": "2012-10-17",
    "Statement": [
        {
            "Effect": "Allow",
            "Action": [
                "autoscaling:DescribeAutoScalingGroups",
                "ec2:AllocateAddress",
                "ec2:AssociateAddress",
                "ec2:AssociateDhcpOptions",
                "ec2:AssociateRouteTable",
                "ec2:AttachInternetGateway",
                "ec2:AttachNetworkInterface",
                "ec2:AuthorizeSecurityGroupEgress",
                "ec2:AuthorizeSecurityGroupIngress",
                "ec2:CopyImage",
                "ec2:CreateDhcpOptions",
                "ec2:CreateInternetGateway",
                "ec2:CreateNatGateway",
                "ec2:CreateNetworkInterface",
                "ec2:CreateRoute",
                "ec2:CreateRouteTable",
                "ec2:CreateSecurityGroup",
                "ec2:CreateSubnet",
                "ec2:CreateTags",
                "ec2:CreateVolume",
                "ec2:CreateVpc",
                "ec2:CreateVpcEndpoint",
                "ec2:DeleteDhcpOptions",
                "ec2:DeleteInternetGateway",
                "ec2:DeleteNatGateway",
                "ec2:DeleteNetworkInterface",
                "ec2:DeletePlacementGroup",
                "ec2:DeleteRoute",
                "ec2:DeleteRouteTable",
                "ec2:DeleteSecurityGroup",
                "ec2:DeleteSnapshot",
                "ec2:DeleteSubnet",
                "ec2:DeleteTags",
                "ec2:DeleteVolume",
                "ec2:DeleteVpc",
                "ec2:DeleteVpcEndpoints",
                "ec2:DeregisterImage",
                "ec2:DescribeAccountAttributes",
                "ec2:DescribeAddresses",
                "ec2:DescribeAvailabilityZones",
                "ec2:DescribeDhcpOptions",
                "ec2:DescribeImages",
                "ec2:DescribeInstanceAttribute",
                "ec2:DescribeInstanceCreditSpecifications",
                "ec2:DescribeInstances",
                "ec2:DescribeInstanceTypeOfferings",
                "ec2:DescribeInstanceTypes",
                "ec2:DescribeInternetGateways",
                "ec2:DescribeKeyPairs",
                "ec2:DescribeNatGateways",
                "ec2:DescribeNetworkAcls",
                "ec2:DescribeNetworkInterfaces",
                "ec2:DescribePrefixLists",
                "ec2:DescribePublicIpv4Pools",
                "ec2:DescribeRegions",
                "ec2:DescribeRouteTables",
                "ec2:DescribeSecurityGroupRules",
                "ec2:DescribeSecurityGroups",
                "ec2:DescribeSubnets",
                "ec2:DescribeTags",
                "ec2:DescribeVolumes",
                "ec2:DescribeVpcAttribute",
                "ec2:DescribeVpcClassicLink",
                "ec2:DescribeVpcClassicLinkDnsSupport",
                "ec2:DescribeVpcEndpoints",
                "ec2:DescribeVpcs",
                "ec2:DetachInternetGateway",
                "ec2:DisassociateAddress",
                "ec2:DisassociateRouteTable",
                "ec2:GetEbsDefaultKmsKeyId",
                "ec2:ModifyInstanceAttribute",
                "ec2:ModifyNetworkInterfaceAttribute",
                "ec2:ModifySubnetAttribute",
                "ec2:ModifyVpcAttribute",
                "ec2:ReleaseAddress",
                "ec2:ReplaceRouteTableAssociation",
                "ec2:RevokeSecurityGroupEgress",
                "ec2:RevokeSecurityGroupIngress",
                "ec2:RunInstances",
                "ec2:TerminateInstances",
                "elasticloadbalancing:AddTags",
                "elasticloadbalancing:ApplySecurityGroupsToLoadBalancer",
                "elasticloadbalancing:AttachLoadBalancerToSubnets",
                "elasticloadbalancing:ConfigureHealthCheck",
                "elasticloadbalancing:CreateListener",
                "elasticloadbalancing:CreateLoadBalancer",
                "elasticloadbalancing:CreateLoadBalancerListeners",
                "elasticloadbalancing:CreateTargetGroup",
                "elasticloadbalancing:DeleteLoadBalancer",
                "elasticloadbalancing:DeleteTargetGroup",
                "elasticloadbalancing:DeregisterInstancesFromLoadBalancer",
                "elasticloadbalancing:DeregisterTargets",
                "elasticloadbalancing:DescribeInstanceHealth",
                "elasticloadbalancing:DescribeListeners",
                "elasticloadbalancing:DescribeLoadBalancerAttributes",
                "elasticloadbalancing:DescribeLoadBalancers",
                "elasticloadbalancing:DescribeTags",
                "elasticloadbalancing:DescribeTargetGroupAttributes",
                "elasticloadbalancing:DescribeTargetGroups",
                "elasticloadbalancing:DescribeTargetHealth",
                "elasticloadbalancing:ModifyLoadBalancerAttributes",
                "elasticloadbalancing:ModifyTargetGroup",
                "elasticloadbalancing:ModifyTargetGroupAttributes",
                "elasticloadbalancing:RegisterInstancesWithLoadBalancer",
                "elasticloadbalancing:RegisterTargets",
                "elasticloadbalancing:SetLoadBalancerPoliciesOfListener",
                "elasticloadbalancing:SetSecurityGroups",
                "iam:AddRoleToInstanceProfile",
                "iam:CreateInstanceProfile",
                "iam:DeleteAccessKey",
                "iam:DeleteInstanceProfile",
                "iam:DeleteUserPolicy",
                "iam:GetInstanceProfile",
                "iam:GetRole",
                "iam:GetRolePolicy",
                "iam:GetUser",
                "iam:GetUserPolicy",
                "iam:ListAccessKeys",
                "iam:ListAttachedRolePolicies",
                "iam:ListInstanceProfiles",
                "iam:ListInstanceProfilesForRole",
                "iam:ListRolePolicies",
                "iam:ListRoles",
                "iam:ListUserPolicies",
                "iam:ListUsers",
                "iam:PassRole",
                "iam:PutUserPolicy",
                "iam:RemoveRoleFromInstanceProfile",
                "iam:SimulatePrincipalPolicy",
                "iam:TagInstanceProfile",
                "iam:TagRole",
                "iam:TagUser",
                "iam:UntagRole",
                "route53:ChangeResourceRecordSets",
                "route53:ChangeTagsForResource",
                "route53:CreateHostedZone",
                "route53:DeleteHostedZone",
                "route53:GetChange",
                "route53:GetHostedZone",
                "route53:ListHostedZones",
                "route53:ListHostedZonesByName",
                "route53:ListResourceRecordSets",
                "route53:ListTagsForResource",
                "route53:UpdateHostedZoneComment",
                "s3:AbortMultipartUpload",
                "s3:CreateBucket",
                "s3:DeleteBucket",
                "s3:DeleteObject",
                "s3:GetAccelerateConfiguration",
                "s3:GetBucketAcl",
                "s3:GetBucketCors",
                "s3:GetBucketLocation",
                "s3:GetBucketLogging",
                "s3:GetBucketObjectLockConfiguration",
                "s3:GetBucketPolicy",
                "s3:GetBucketPublicAccessBlock",
                "s3:GetBucketRequestPayment",
                "s3:GetBucketTagging",
                "s3:GetBucketVersioning",
                "s3:GetBucketWebsite",
                "s3:GetEncryptionConfiguration",
                "s3:GetLifecycleConfiguration",
                "s3:GetObject",
                "s3:GetObjectAcl",
                "s3:GetObjectTagging",
                "s3:GetObjectVersion",
                "s3:GetReplicationConfiguration",
                "s3:ListBucket",
                "s3:ListBucketMultipartUploads",
                "s3:ListBucketVersions",
                "s3:PutBucketAcl",
                "s3:PutBucketPolicy",
                "s3:PutBucketPublicAccessBlock",
                "s3:PutBucketTagging",
                "s3:PutEncryptionConfiguration",
                "s3:PutLifecycleConfiguration",
                "s3:PutObject",
                "s3:PutObjectAcl",
                "s3:PutObjectTagging",
                "servicequotas:ListAWSDefaultServiceQuotas",
                "sts:AssumeRole",
                "tag:GetResources",
                "tag:UntagResources"
            ],
            "Resource": "*"
        }
    ]
}
Trust relationship:
{
    "Version": "2012-10-17",
    "Statement": [
        {
            "Effect": "Allow",
            "Principal": {
                "Service": "ec2.amazonaws.com"
            },
            "Action": "sts:AssumeRole"
        }
    ]
}
Next, you need to create an IAM role with the required permission policy and trust relationship for the OpenShift Installer to attach to the controlPlane nodes.
OpenShift ControlPlane Permissions
Policy:
{
    "Version": "2012-10-17",
    "Statement": [
        {
            "Sid": "Statement1",
            "Effect": "Allow",
            "Action": [
                "ec2:AttachVolume",
                "ec2:AuthorizeSecurityGroupIngress",
                "ec2:CreateSecurityGroup",
                "ec2:CreateTags",
                "ec2:CreateVolume",
                "ec2:DeleteSecurityGroup",
                "ec2:DeleteVolume",
                "ec2:Describe*",
                "ec2:DetachVolume",
                "ec2:ModifyInstanceAttribute",
                "ec2:ModifyVolume",
                "ec2:RevokeSecurityGroupIngress",
                "elasticloadbalancing:AddTags",
                "elasticloadbalancing:AttachLoadBalancerToSubnets",
                "elasticloadbalancing:ApplySecurityGroupsToLoadBalancer",
                "elasticloadbalancing:CreateListener",
                "elasticloadbalancing:CreateLoadBalancer",
                "elasticloadbalancing:CreateLoadBalancerPolicy",
                "elasticloadbalancing:CreateLoadBalancerListeners",
                "elasticloadbalancing:CreateTargetGroup",
                "elasticloadbalancing:ConfigureHealthCheck",
                "elasticloadbalancing:DeleteListener",
                "elasticloadbalancing:DeleteLoadBalancer",
                "elasticloadbalancing:DeleteLoadBalancerListeners",
                "elasticloadbalancing:DeleteTargetGroup",
                "elasticloadbalancing:DeregisterInstancesFromLoadBalancer",
                "elasticloadbalancing:DeregisterTargets",
                "elasticloadbalancing:Describe*",
                "elasticloadbalancing:DetachLoadBalancerFromSubnets",
                "elasticloadbalancing:ModifyListener",
                "elasticloadbalancing:ModifyLoadBalancerAttributes",
                "elasticloadbalancing:ModifyTargetGroup",
                "elasticloadbalancing:ModifyTargetGroupAttributes",
                "elasticloadbalancing:RegisterInstancesWithLoadBalancer",
                "elasticloadbalancing:RegisterTargets",
                "elasticloadbalancing:SetLoadBalancerPoliciesForBackendServer",
                "elasticloadbalancing:SetLoadBalancerPoliciesOfListener",
                "kms:DescribeKey"
            ],
            "Resource": "*"
        }
    ]
}
Trust relationship:
{
    "Version": "2012-10-17",
    "Statement": [
        {
            "Effect": "Allow",
            "Principal": {
                "Service": "ec2.amazonaws.com"
            },
            "Action": "sts:AssumeRole"
        }
    ]
}
Now, create an IAM role with the required permission policy and trust relationship for the OpenShift Installer to attach to the worker nodes.
Policy:
{
    "Version": "2012-10-17",
    "Statement": [
        {
            "Effect": "Allow",
            "Action": [
                "ec2:DescribeInstances",
                "ec2:DescribeRegions"
            ],
            "Resource": "*"
        }
    ]
}
Trust relationship:
{
    "Version": "2012-10-17",
    "Statement": [
        {
            "Effect": "Allow",
            "Principal": {
                "Service": "ec2.amazonaws.com"
            },
            "Action": "sts:AssumeRole"
        }
    ]
}
Installation configuration
See [2] section: 3.3.4. Alternatives to storing administrator-level secrets in the kube-system project
You can create an install-config manifest (i.e. install-config.yaml) and specify the IAM roles for nodes:
- controlPlane nodes: controlplane.platform.aws.iamRole
- Worker nodes: compute[].platform.aws.iamRole
This an example install-config.yaml content:
apiVersion: v1
baseDomain: mydomain
credentialsMode: Manual
compute:
- architecture: amd64
  hyperthreading: Enabled
  name: worker
  platform:
    aws:
      type: m5.xlarge
      iamRole: openshift-worker
      metadataService:
        authentication: Required
  replicas: 3
controlPlane:
  architecture: amd64
  hyperthreading: Enabled
  name: master
  platform:
    aws:
      type: m5.xlarge
      iamRole: openshift-master
      metadataService:
        authentication: Required
  replicas: 3
metadata:
  creationTimestamp: null
  name: ipi1
networking:
  clusterNetwork:
  - cidr: 10.132.0.0/14
    hostPrefix: 23
  machineNetwork:
  - cidr: 10.1.1.0/24
  networkType: OVNKubernetes
  serviceNetwork:
  - 172.31.0.0/16
platform:
  aws:
    hostedZone: MyHOSTEDZONE
    region: MyRegion
    vpc:
      subnets:
      - id: subnet-123345464567
    userTags:
      WorkloadName: IPI1
      Owner: momo
      Environment: DEV
publish: Internal
pullSecret: ‘{my-pull-secret-here}’
sshKey: '{my-ssh-key-here}’
additionalTrustBundlePolicy: Proxyonly
additionalTrustBundle: |
  ‘REDACTED’
Installation process
See [2] section: 3.3.4.1. Manually creating long-term credentials (using ccoctl to create cco roles).
Get binaries (4.19.1) [3]. To get the installer and ccoctl binaries, do the following:
$ wget https://mirror.openshift.com/pub/openshift-v4/x86_64/clients/ocp/latest/ccoctl-linux-rhel8.tar.gz
$ wget https://mirror.openshift.com/pub/openshift-v4/x86_64/clients/ocp/latest/openshift-client-linux-amd64-rhel8.tar.gz
$ wget https://mirror.openshift.com/pub/openshift-v4/x86_64/clients/ocp/latest/openshift-install-linux.tar.gz
$ tar xvzf ccoctl-linux-rhel8.tar.gz
$ tar xvzf openshift-client-linux-amd64-rhel8.tar.gz
$ tar xvzf openshift-install-linux.tar.gz
Copy configuration and extract credential requests
To extract the list of CredentialsRequest manifests from the OpenShift release image, run the following:
$ mkdir config
# install-config.yaml.bak contains the original copy of the configuration
$ cp install-config.yaml.bak config/install-config.yaml

$ RELEASE_IMAGE=$(./openshift-install version | awk '/release image/ {print $3}')

$ oc adm release extract --from=$RELEASE_IMAGE --credentials-requests --included --install-config=config/install-config.yaml --to=creds
Create OIDC provider and IAM roles with ccoctl
We need to generate the public and private RSA key files that are used to set up the OpenID Connect provider for the cluster.
$ ccoctl aws create-key-pair --output-dir ./secrets_for_manual_modeWe then create an OpenID Connect identity provider and S3 bucket. In this case, we create a private S3 bucket and use AWS CloudFront Distribution to expose the public OpenID Connect document.
To identify the components and permissions used by the OIDC provider, take advantage of the --dry-run option, which produces the following output:
$ ccoctl aws create-identity-provider --name ocpipi --region "${AWS_REGION}" --output-dir ./secrets_for_manual_mode --public-key-file ./secrets_for_manual_mode/serviceaccount-signer.public --create-private-s3-bucket --dry-run

2025/06/25 23:10:40 Saving OIDC S3 bucket locally at secrets_for_manual_mode/01-oidc-bucket.json
2025/06/25 23:10:40 Saving JSON to create CloudFront Origin Access Identity locally at secrets_for_manual_mode/05-cloudfront-origin-access-identity.json
2025/06/25 23:10:40 Saving JSON to put bucket policy allowing access from CloudFront Origin Access Identity locally at secrets_for_manual_mode/06-put-bucket-policy-to-allow-origin-access-identity.json
2025/06/25 23:10:40 Saving JSON to block public access to OIDC S3 bucket locally at secrets_for_manual_mode/01-oidc-bucket.json
2025/06/25 23:10:40 Saving JSON to create CloudFront Distribution locally at secrets_for_manual_mode/08-cloudfront-distribution.json
2025/06/25 23:10:40 Saving discovery document locally at secrets_for_manual_mode/02-openid-configuration
2025/06/25 23:10:40 Reading public key
2025/06/25 23:10:40 Saving JSON web key set (JWKS) locally at secrets_for_manual_mode/03-keys.json
2025/06/25 23:10:40 Saving AWS IAM Identity Provider locally at secrets_for_manual_mode/04-iam-identity-provider.json
2025/06/25 23:10:40 Wrote cluster authentication manifest at path secrets_for_manual_mode/manifests/cluster-authentication-02-config.yaml
2025/06/25 23:10:40 Issuer URL (serviceAccountIssuer) is <enter_cloudfront_distribution_url_here>
To proceed with creation, run it without the --dry-run option.
$ ccoctl aws create-identity-provider --name ocpipi --region "${AWS_REGION}" --output-dir ./secrets_for_manual_mode --public-key-file ./secrets_for_manual_mode/serviceaccount-signer.public --create-private-s3-bucket

2025/06/25 23:10:40 Identity Provider created with ARN: arn:aws:iam::123456789:oidc-provider/cf12345.cloudfront.net
2025/06/25 23:10:40 Wrote cluster authentication manifest at path secrets_for_manual_mode/manifests/cluster-authentication-02-config.yaml
2025/06/25 23:10:40 Issuer URL (serviceAccountIssuer) is https://cf12345.cloudfront.net
Test:
$ curl https://cf12345.cloudfront.net/.well-known/openid-configuration The curl command should output the content of openID configuration document.
IAM roles:
To create IAM roles for each component in the cluster, run the following:
$ export OIDC_PROVIDER_ARN="arn:aws:iam::123456789:oidc-provider/cf12345.cloudfront.net"
$ ccoctl aws create-iam-roles --name=ocpipi --region="${AWS_REGION}" --credentials-requests-dir=./creds  --identity-provider-arn="${OIDC_PROVIDER_ARN}" --output-dir=./secrets_for_manual_mode
For each CredentialsReques, ccoctl creates an IAM role with the defined permission policies and a trust policy tied to the previous OIDC identity provider.
Generate manifests and copy ccoctl files:
To incorporate ccoctl-generated manifests into the installer, run the following:
$ openshift-install create manifests --dir config

$ cp -a ./secrets_for_manual_mode/manifests/* ./config/manifests/
$ cp -a ./secrets_for_manual_mode/tls ./config/ # tls dir must be copied into this location
Run final cluster create command:
To create an OpenShift cluster, run:
$ ./openshift-install create cluster --dir ./config/ --log-level=infoUninstalling OpenShift:
To uninstall an OpenShift cluster, run:
$ ./openshift-install destroy cluster --dir ./config/ --log-level=infoUninstall ccoctl:
To delete resources created by ccoctl, run:
$ ccoctl aws delete --name=ocpipi --region=us-west-2Note: Deleting this while being used by a live cluster could have unpredictable consequences.
Why the OIDC endpoint must be public
A public-facing URL is required to host the OIDC discovery documents. These documents include:
- The provider’s configuration (.well-known/openid-configuration): This file tells AWS where to find the public keys.
- The public keys (keys.json): This file contains the public part of the key pair you created in Step 1.
The justification for this public endpoint is based on how AWS IAM works as a global service.
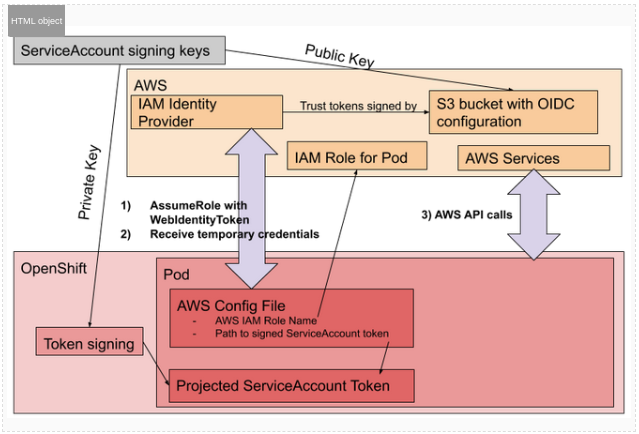
When a pod in your OpenShift cluster wants to assume an IAM role, it sends its internal JWT to the AWS Security Token Service (STS). To trust that this token is legitimate, AWS STS must independently verify its signature. To do this, it acts as an external client and performs the following actions:
- It looks at the IAM Role the pod is trying to assume and finds the trusted OIDC Identity Provider you configured.
- It takes the URL from that OIDC provider configuration (the public-facing CloudFront or S3 URL).
- It connects to that public URL over the internet to download the discovery documents and, most importantly, the public key.
- It uses that public key to cryptographically verify that the JWT it received from the pod was indeed signed by the trusted OpenShift cluster.
Because the AWS IAM service operates outside of the private network (VPC), it cannot access internal-only endpoints. It needs a publicly accessible, stable HTTPS endpoint to fetch these verification materials. This is a fundamental requirement of the OIDC federation model that allows AWS to securely establish trust with an external identity provider like your OpenShift cluster.
STS flow: The following graph in Figure 1 shows the AWS security token service flow.
Refer to the documentation on GitHub for more information.
Wrap up
By following this guide, you have successfully installed an OpenShift IPI cluster on AWS using a least-privilege security model. This approach significantly enhances your security posture by avoiding the use of long-lived, administrator-level access keys and ensuring that every component, from the installation host to the individual cluster operators, is granted only the permissions it strictly requires.
The core principles of pre-creating IAM roles, using credentialsMode: Manual, and leveraging short-term STS credentials via the ccoctl utility are central to this method. The ability to perform a --dry-run to generate and audit all IAM policies before deployment provides a critical control gate, ensuring transparency and adherence to your organization’s security standards.
While this method requires more initial configuration than a standard installation, the long-term benefits of a more secure, auditable, and compliant OpenShift environment on AWS are a compelling advantage.
The post Least-privilege installation of OpenShift IPI on AWS appeared first on Red Hat Developer.


