Simplify local prototyping with Camel JBang infrastructure
28 August 2025
Here is the cleaned and sarcastic version of the provided text:
Apache Camel is a powerful open source integration framework that simplifies connecting and mediating with systems like databases, messaging platforms, or APIs. It enables developers to create complex integration flows with minimal code. But what if you just need to prototype a solution locally without the hassle of setting up complex infrastructure? That’s where Camel JBang comes in.
Camel JBang is a command-line interface (CLI) that makes it incredibly easy to quickly prototype and test integration flows without the need for extensive setup. It provides a simple, intuitive interface that allows you to launch backends like Kafka, databases, or FTP servers in a matter of seconds, eliminating the need for a complex infrastructure setup. And the best part is, it’s all done from within a single command line. No need to worry about Docker or Testcontainers, as Camel JBang uses Testcontainers and Docker (or Podman) to deploy
Apache Camel is an open source integration framework that simplifies connecting and mediating with systems like databases, messaging platforms, or APIs. It enables developers to create integration flows with minimal code. Camel JBang is a command-line interface (CLI) that accelerates prototyping by letting developers quickly create, validate, and tweak these flows without complex setups, making it perfect for rapid experimentation.
A key feature of Camel JBang is its infra command. It allows developers to launch backends like Kafka, databases, or FTP servers instantly, avoiding the complexity of managing infrastructure. The infra command uses the power of Testcontainers and Docker (or Podman), deploying real systems and saving developers from the hassle of preparing mocks and complicated environment configurations.
For example, to try out an integration flow with a Kafka messaging system, you might generally need to set up a cluster with multiple containers or pods, which can be time-consuming and costly. When you run a command like camel infra run kafka, Camel JBang uses Testcontainers to access your local Docker environment. It pulls a Kafka image, starts a container, and displays connection details on your screen. You can then set up your Camel route to send or receive messages, experimenting locally with ease.
Let’s see the infra command in action in the example below, where you’ll see the developer focus on prototyping a solution locally, avoiding time-consuming and tedious infrastructure preparations.
Demo: Modernizing a Legacy API with camel infra
This section demonstrates how camel infra helps modernize a legacy XML-based API, like the one represented in Figure 1.
Figure 1: Original API service.
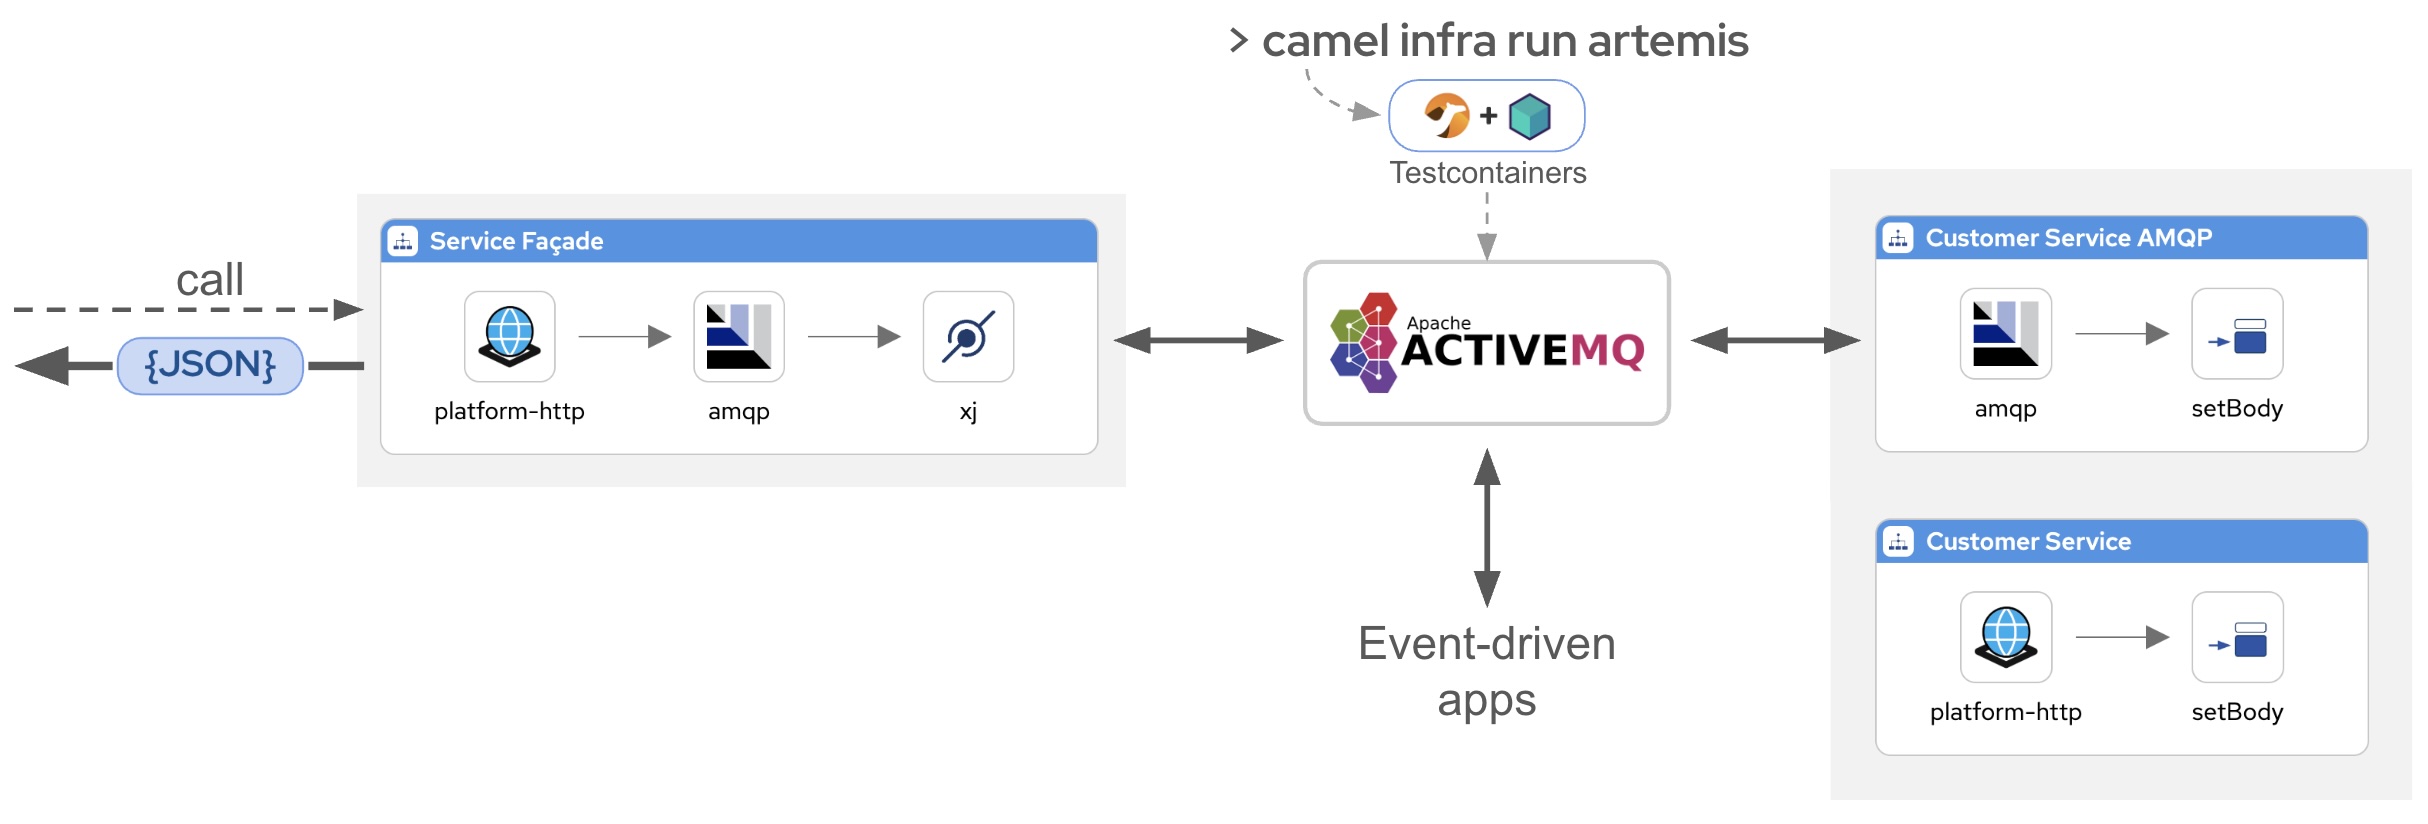
The goal is to expose the service as a JSON-based API and decouple it from the legacy system using AMQP messaging using AMQ (ActiveMQ). The upgrade brings 2 significant benefits:
Passing the customer id as a query parameter gives us XML data with the customer identifier 123 included.
2. Launch an instance of AMQP using camel infra
This is the key moment we’ve been waiting for: to see camel infra in action.
Before implementing the new AMQP entry point in Camel, we will use Camel JBang (CLI) to launch an infra instance of an Artemis broker. From a terminal, issue the following command:
> camel infra run artemis
Starting service artemis
{
  "brokerPort" : 61616,
  "password" : "artemis",
  "remoteURI" : "tcp://localhost:61616",
  "restart" : null,
  "serviceAddress" : "tcp://localhost:61616",
  "userName" : "artemis"
}
Press any key to stop the execution
The infra command locates our local Docker environment, downloads an image with Artemis, launches a container, and prints out the connectivity details.
You can run the following command to view all running instances:
> camel infra ps
 ALIAS             IMPLEMENTATION  DESCRIPTION
 artemis           amqp            Apache Artemis is an open source message broker
The Artemis broker is up and running. It even has a visual dashboard we will use later for testing.
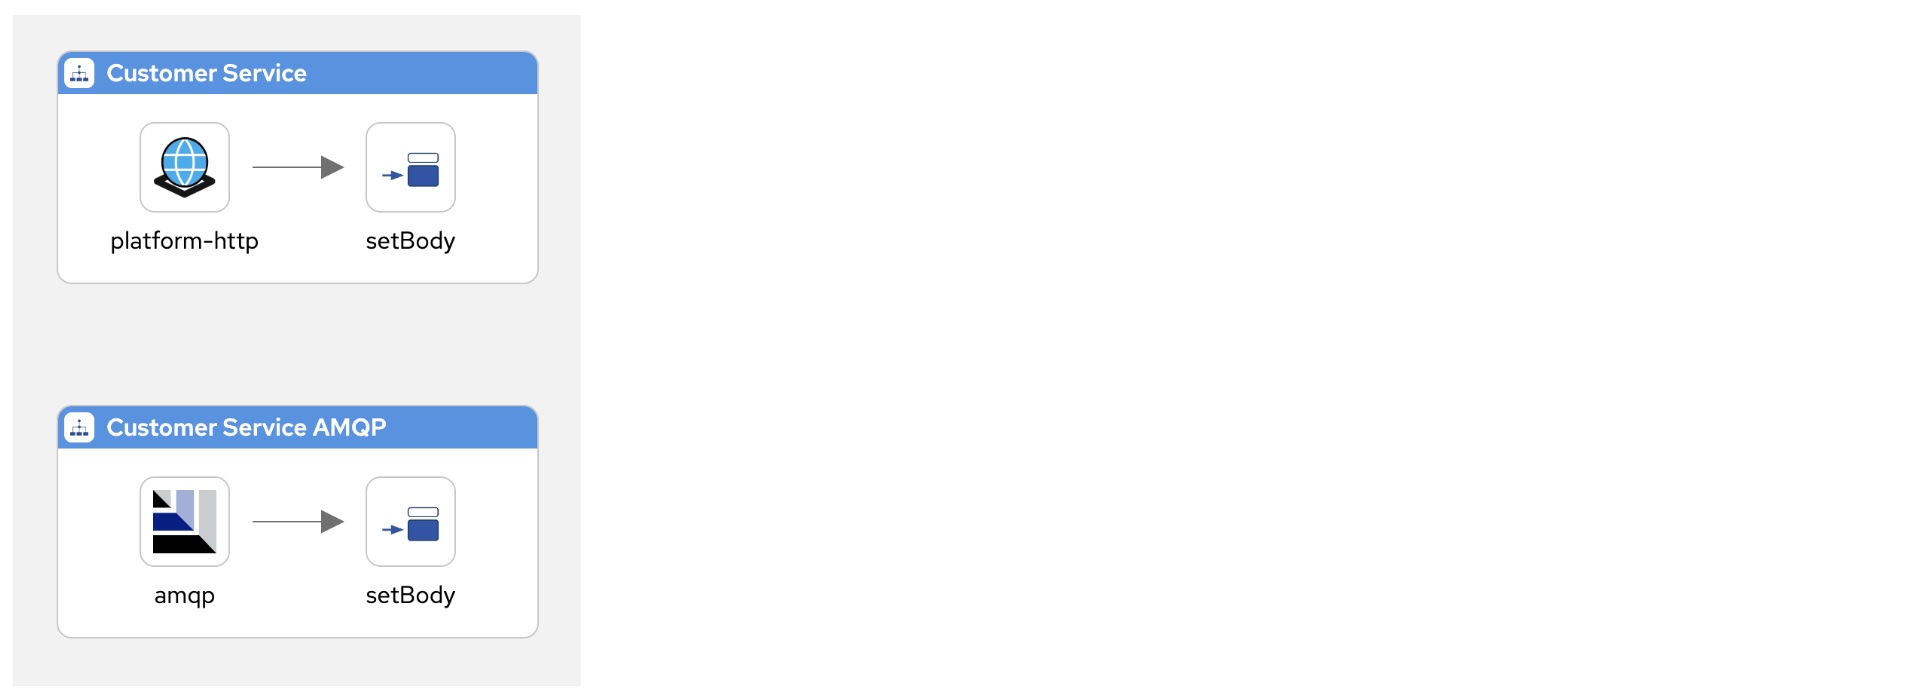
3. Create the AMQP entry point
Next, we use the infra‘s remoteURI parameter value to include in the Camel definition the bean that provides AMQP connectivity to Camel.
Both processes (HTTP/AMQP entrypoints) can also be modeled using Kaoto, the VS Code extension you can install to design Camel processes. Figure 3 shows the Camel routes that Kaoto visually generates.
Figure 3: Camel route definitions in Kaoto.
The AMQP Bean connector is also visible and configurable in Kaoto (Figure 4).
Figure 4: AMQP bean definition in Kaoto.
Test the AMQP listener
Once the changes are applied, you can open the Artemis UI, which is included in the Camel infra AMQP instance, to test the new AMQP entry point. Open it in your browser by pointing to the following local address: http://localhost:8161
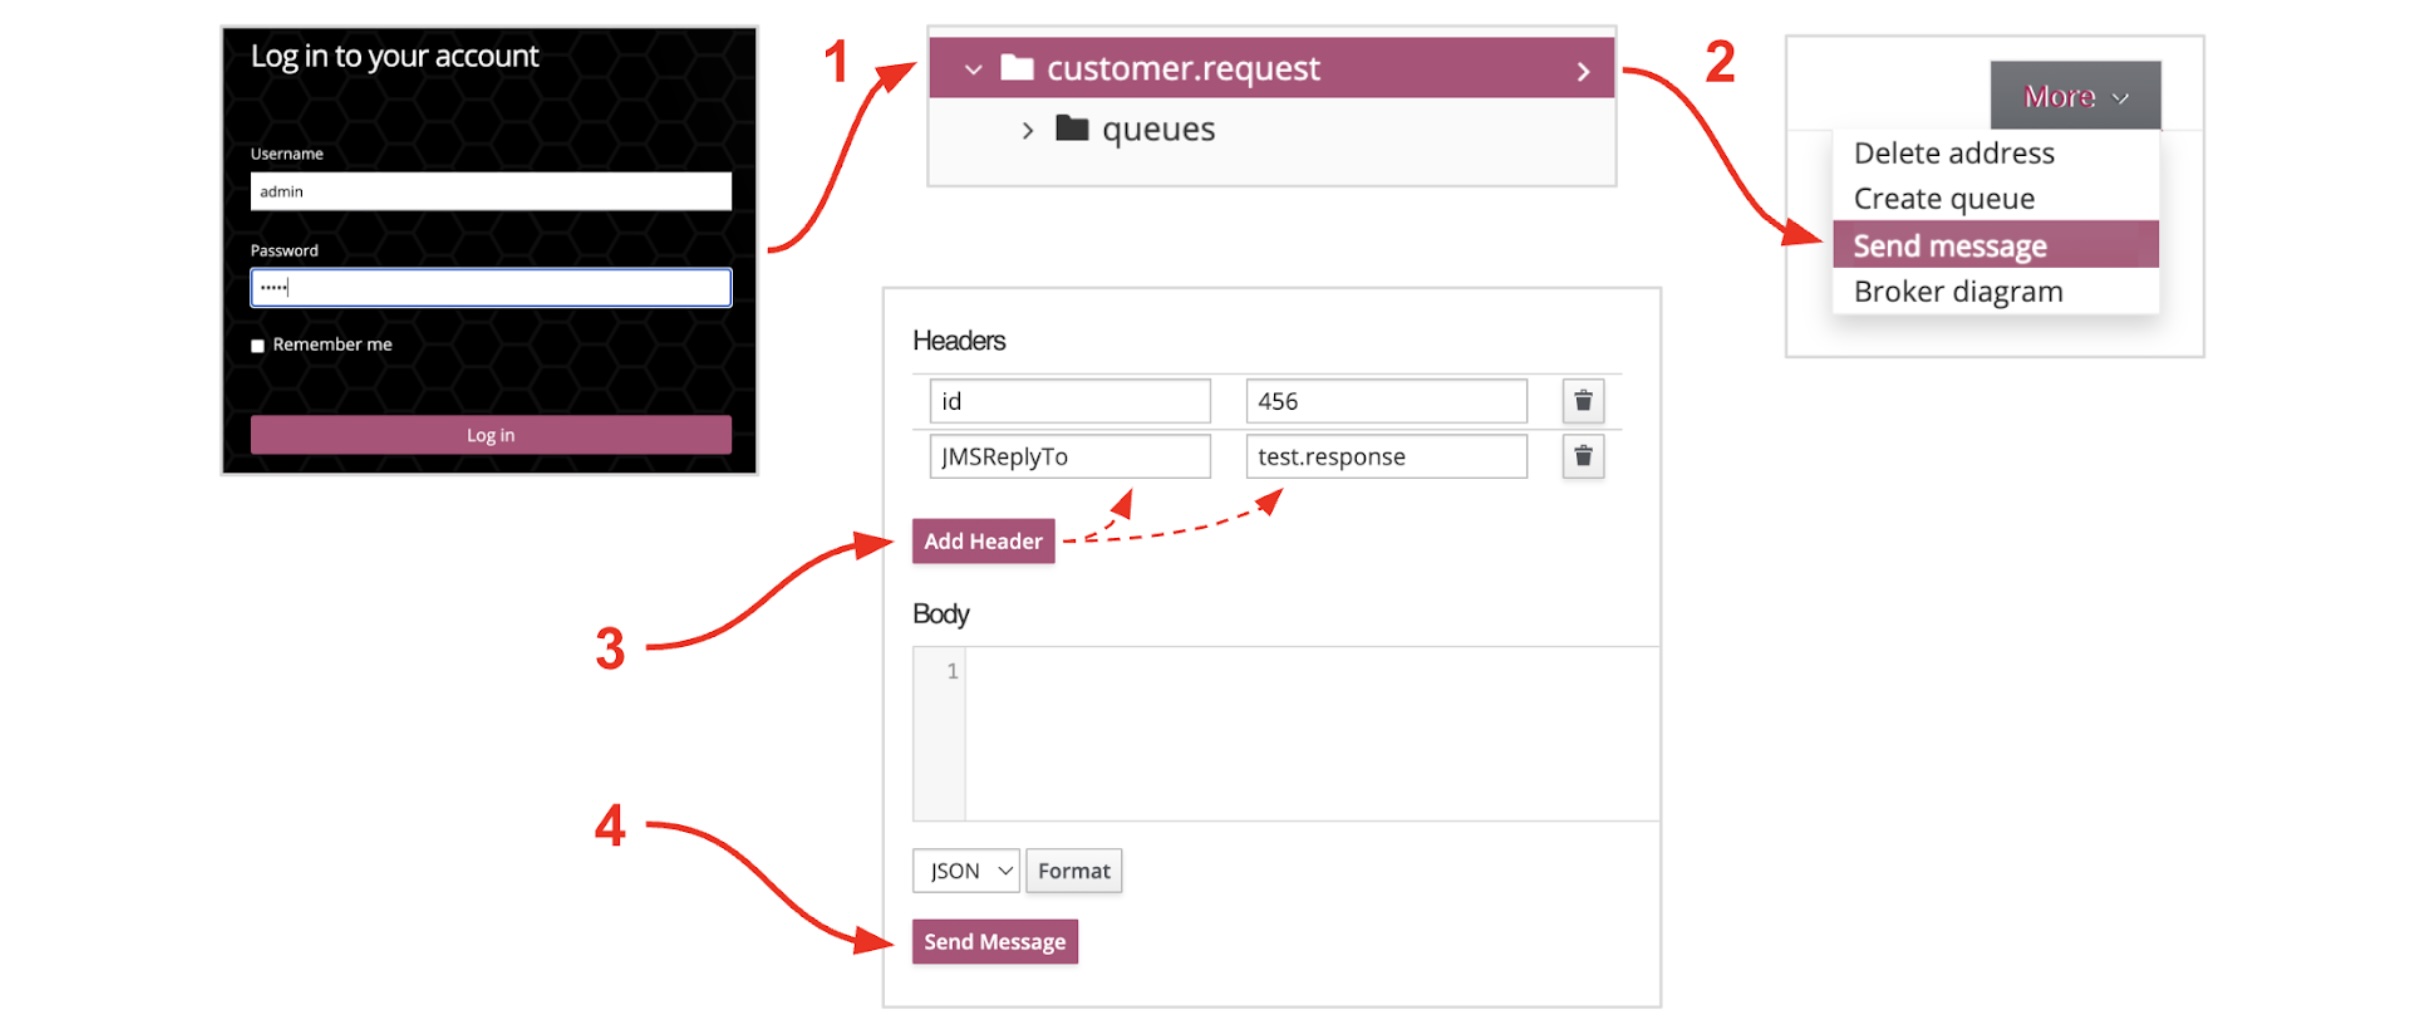
Log in using the artemis/artemis credentials. Navigate the UI, find the page from where you can send messages, and publish the event to the queue, as illustrated in Figure 5.
Figure 5: Sending a message in the Artemis admin console.
We provide a header ID, equivalent to the customer ID via HTTP, and the JMSReplyTo header, which indicates the queue where Camel should send the response.
When the message is sent, Camel consumes the event, generates the XML response, maps the customer ID, and uses the reply queue to respond.
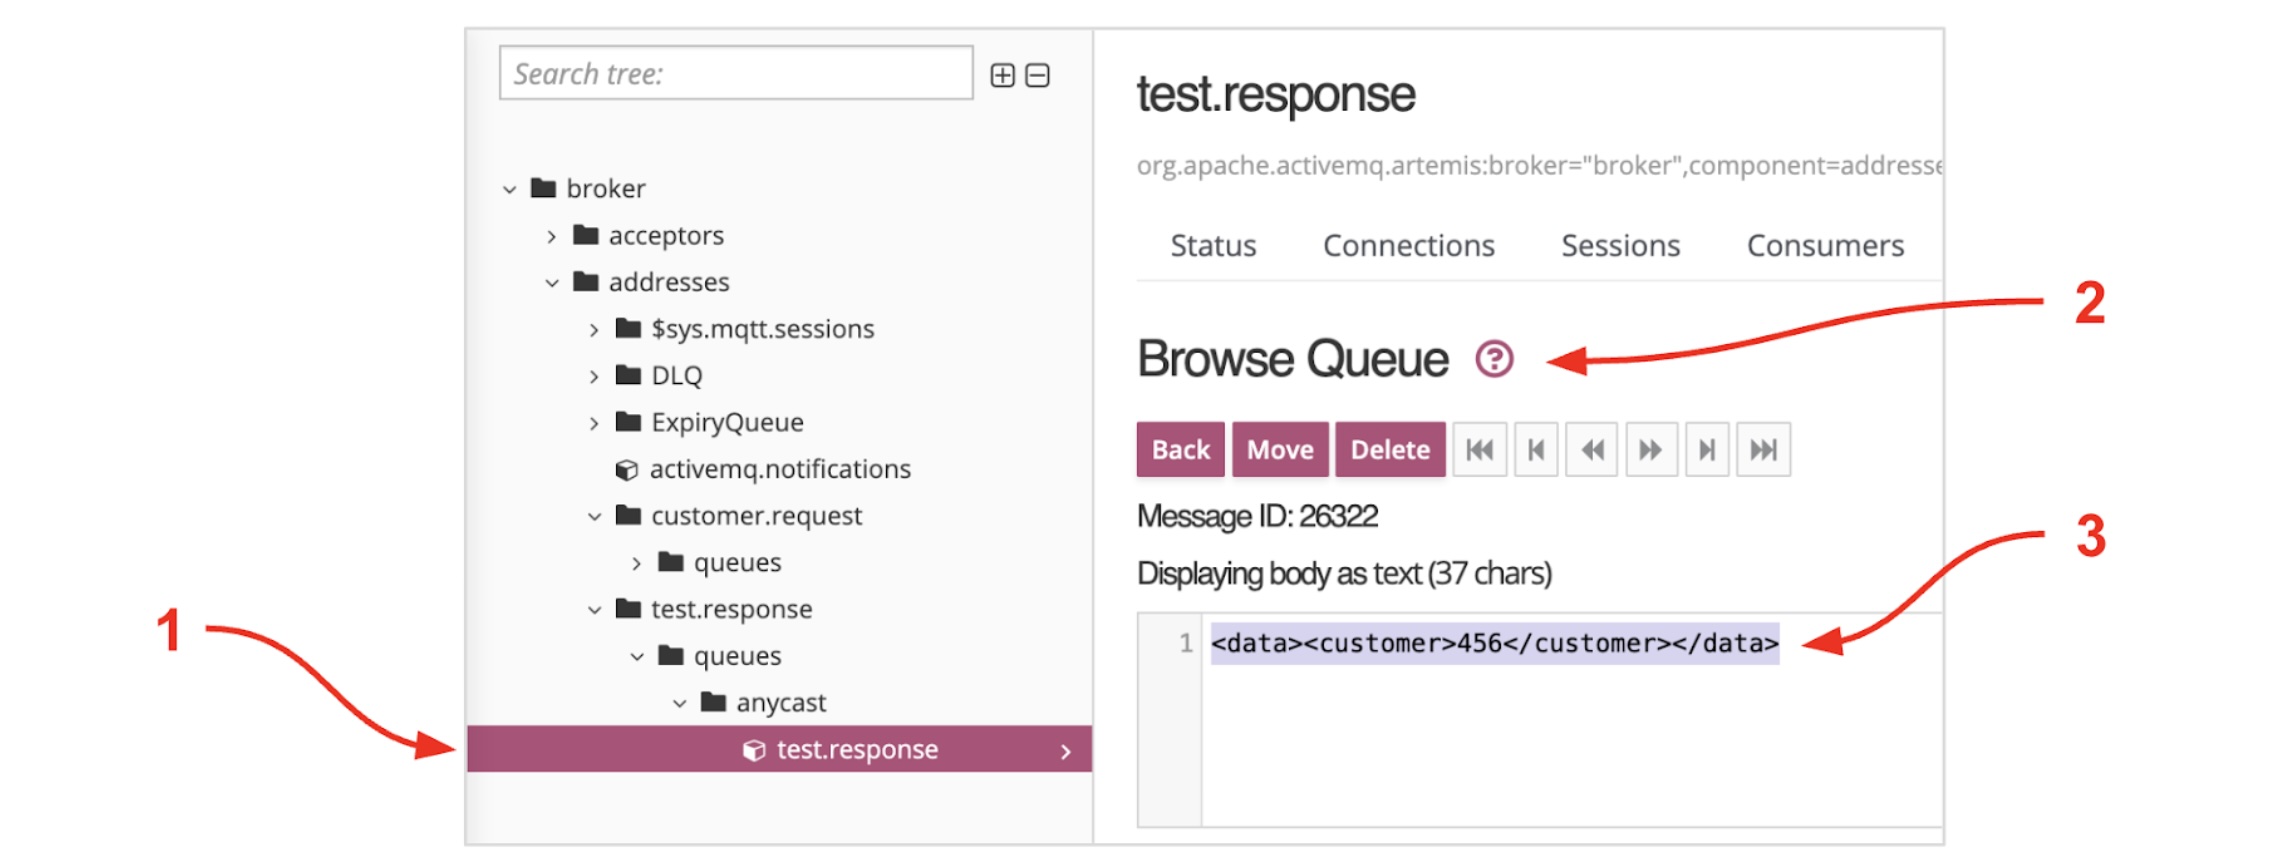
When Camel responds, Artemis automatically creates the queue where the response is kept. You can navigate the UI and browse the response queue to inspect the available messages and show their content, as illustrated in Figure 6.
Figure 6: Artemis admin console browse message.
Iin Figure 6 (pointer 3), we observe the XML response produced by Camel. The test validates that the new AMQP listener in Camel is operating as expected.
Camel JBang also comes in handy to validate the result. The command below instructs Camel JBang to connect to the response queue, consume the message, and print it out:
This is the final piece that exposes the new JSON interface. This layer is just a facade of the existing XML entry point where the original service implementation is kept intact, but decoupled from AMQP.
Remember, Camel allows defining routes using Java, XML, or YAML. It also has Kaoto as a low-code design tool. The following definition is expressed in YAML and can be opened with Kaoto:
You can edit or open the above definition using Kaoto, which displays it as illustrated in Figure 7.
Figure 7: Service facade definition in Kaoto.
The new Camel route bridges incoming HTTP requests to request/reply AMQP interactions. It also transforms the XML response into JSON using the XJ Camel component.
Calling the new service by issuing a curl command results in:
The infra command in Camel JBang is valuable for quick experiments or validating flows before scaling to production. It supports various backends, such as AMQP (Artemis in the demo), Kafka, databases, or FTP servers. The Camel JBang CLI lets you list available infra options, run multiple services, stop them, view connection details, or check logs for debugging.
Whether you’re new to Apache Camel or an experienced developer, infra makes the process of connecting and validating integration flows straightforward and efficient. Explore camel infra in Camel JBang to simplify your development process.
Want to learn more?
Here are some recommended resources for additional learning: